How to Use Marine Navigation Lights Properly

Marine navigation lights are essential safety components in maritime operations, ensuring that vessels are visible to each other during nighttime or in low-visibility conditions. These lights convey critical information about a vessel’s size, type, direction, and operational status, helping to prevent collisions and allowing for safe navigation in congested or narrow waterways. Proper use of navigation lights is not just a matter of regulatory compliance and it is a fundamental practice for ensuring the safety of life at sea.

Customize Colors for Marine Navigation Lights

The Role of Navigation Lights in Marine Safety

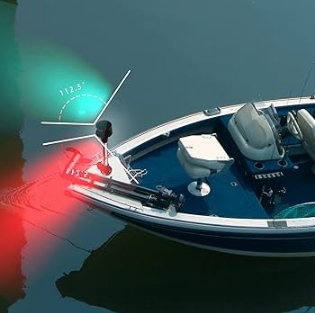
Marine navigation lights serve as a visual communication system among vessels. By displaying specific light colors, positions, and patterns, a ship conveys its relative motion and operational state to others. For example, red and green sidelights indicate a vessel’s port (left) and starboard (right) sides, respectively, while a white stern light shows the rear of the vessel. Masthead lights, usually white, show the direction a power-driven vessel is heading.

When properly displayed, these lights help mariners assess the orientation and movement of nearby vessels, allowing them to make safe navigational decisions. This is especially critical in busy sea lanes, during poor weather, or at night, when visual cues are limited.

Regulations and Compliance

The use of navigation lights is governed by international regulations such as the International Regulations for Preventing Collisions at Sea (COLREGs), established by the International Maritime Organization (IMO). These rules stipulate when and how lights must be used depending on a vessel’s type, size, and activity.

For instance, a vessel under 50 meters in length must display a single white masthead light, while larger vessels require two. Sailing vessels use a different configuration, typically red and green sidelights and a white stern light, without a masthead light unless they are also using engine power. Vessels at anchor must show an all-around white light, while those engaged in specific activities—like fishing or towing—use combinations of colored lights to signal their operations.

CXH-21P Single-deck Navigation Signal Light Supplier

Common Mistakes and Their Consequences

Improper use of navigation lights can result in serious accidents. Some common errors include using the wrong color or type of light, failing to activate lights during dusk or low visibility, or having lights obscured or malfunctioning. These mistakes can lead to misinterpretation of a vessel’s position and motion, increasing the risk of collision.

Moreover, failure to comply with lighting regulations may result in legal penalties, especially in territorial waters or busy commercial ports where maritime safety is strictly enforced.

Best Practices for Proper Use

Ensuring proper use of marine navigation lights begins with regular inspection and maintenance. Lights should be clean, functional, and unobstructed. Bulbs and electrical connections must be routinely checked for corrosion or failure. Crew members should be trained to understand light configurations and ensure they are switched on at the correct times—usually from sunset to sunrise or during restricted visibility.

In addition, any retrofits or upgrades to a vessel’s lighting system must comply with relevant regulations. Using certified equipment from reputable marine lighting manufacturers ensures reliability and adherence to international standards.

double-deck marine navigation lights

Final Thoughts

Marine navigation lights are a vital aspect of vessel safety and maritime communication. Their proper use ensures that all vessels—whether commercial, recreational, or military—can navigate safely and avoid collisions. Adhering to regulations, performing routine maintenance, and educating crew members about correct light configurations are key steps toward achieving a safe and responsible maritime environment.

What are the Different Types of Marine Mooring Bollards

Marine mooring bollards are vital components in port and harbor infrastructure, designed to securely anchor mooring lines from vessels during docking. These fixtures must withstand immense forces from ships of varying sizes, affected by tides, wind, and currents. Bollards come in a range of designs and materials, each suited for different berthing conditions and vessel types. Understanding the various types of marine mooring bollards is crucial for ensuring safe and efficient mooring operations.

Tee Head Bollards

Tee head bollards, also known as T-head bollards, are among the most common types used in ports worldwide. Their distinctive “T” shape allows for multiple mooring lines to be secured at once from different angles. Tee head bollards are suitable for large vessels and high-capacity berths, as they offer excellent load-handling capabilities and robust performance in harsh marine environments.

T head type bollard

Horn Bollards

Horn bollards are characterized by their twin-arm structure, resembling a pair of horns. This design enables operators to loop lines around the arms quickly and securely. Horn bollards are ideal for areas where frequent line handling is required, such as ferry terminals or fishing harbors. Their symmetrical shape allows mooring lines to be tied off from various directions with minimal risk of slippage.

Single Bitt Bollards

Single bitt bollards consist of a single cylindrical post mounted vertically. These bollards are compact, versatile, and often used for smaller vessels or auxiliary mooring. Although they handle lower loads than tee head or horn bollards, their simple design makes them easy to maintain and install in confined dock spaces.

Double Bitt Bollards

Double bitt bollards feature two vertical posts mounted side by side on a common base. This configuration allows greater flexibility for tying multiple mooring lines, and can be particularly effective in distributing line tension evenly. Double bitt bollards are frequently used in inland ports or terminals with variable vessel sizes and line arrangements.

DIN82607 Double Bitt Bollard

Kidney-Shaped Bollards

Kidney-shaped dock bollards have an asymmetric, rounded shape that allows mooring lines to be pulled at sharper angles without slipping off. These are commonly used in locations with constrained quay space or where the angle of mooring lines is unpredictable due to tidal variations or maneuvering vessels. They are also designed to minimize rope wear and deformation.

Kidney Dock Bollard

Pillar Bollards

Pillar bollards are simple cylindrical posts that offer 360-degree access for mooring lines. They are well-suited to marinas, small harbors, and yacht facilities where aesthetics and compact size are often as important as function. Though not ideal for handling heavy loads, they provide flexibility and ease of use for lighter mooring applications.

Summary

Choosing the right type of marine mooring bollard depends on a combination of factors, including the size and type of vessel, environmental conditions, dock layout, and operational needs. From heavy-duty tee head bollards to sleek pillar bollards, each design serves a specific purpose in ensuring secure and stable mooring. Proper selection and maintenance of these bollards not only improve mooring efficiency but also enhance safety for port operations.

What are Volute Springs: 3 Key Points You Need to Know

Volute springs are a unique and robust type of compression spring, easily identified by their conical, spiral-shaped design. Unlike traditional helical springs, volute springs are formed from a strip of metal wound into a spiral that gradually increases in diameter from one end to the other. This configuration allows the coils to nest into each other when compressed, offering distinct advantages in strength and space-saving design.

volute springs

Structural Features of Volute Springs

The most defining characteristic of a volute spring is its conical shape. The metal strip is typically coiled in a way that each layer of the spiral can slide over the previous one during compression. The coiled design volute spiral springs not only provides a high load-bearing capacity but also results in a much shorter compressed height compared to cylindrical springs of the same length and diameter. The material used in volute springs is often high-strength steel or stainless steel to endure high stress and repeated cycling.

Volute Spiral Coils Spring

Functional Advantages

Volute springs are known for their ability to withstand significant force in a compact form factor. Because the coils nest into one another, the spring can compress more fully than traditional types, making it suitable for applications where space is limited. Additionally, the volute shape provides superior resistance to buckling, especially under axial loads, which enhances durability in demanding environments.

Their ability to maintain force consistency even under variable loading makes them valuable in applications where reliability is paramount. Furthermore, the broad surface area in contact between the coils can help dampen vibration and reduce noise, which is beneficial in precision equipment.

Industrial Applications

Volute springs are used across various industries due to their strength and resilience. One of their most well-known applications is in heavy-duty railway buffers and couplers, where they absorb impact and vibration efficiently. They are also employed in military equipment such as tank tracks, where compact and powerful springing systems are needed to absorb shocks from rugged terrain.

In construction machinery and mining tools, volute springs contribute to the shock absorption mechanisms that protect both operators and equipment. Some consumer products and specialized furniture mechanisms also utilize smaller volute springs to take advantage of their space-saving compression features.

Conclusion

Volute springs, with their conical and nested coil design, represent an engineering solution that combines compactness with high strength. Their unique structural and functional properties make them ideal for demanding applications across transportation, defense, and industrial machinery. As the demand for space-efficient and durable components grows, volute springs continue to prove their value in modern mechanical systems.

How to Troubleshoot Common Issues in the Operation of FTIR Spectrophotometers

Fourier Transform Infrared (FTIR) spectrophotometers are essential tools in analytical laboratories, widely used for identifying organic and inorganic materials by measuring their infrared absorption spectra. However, like any precision instrument, FTIR spectrophotometers can encounter operational issues that affect performance and data quality. Prompt troubleshooting is crucial to minimize downtime and maintain accurate results. This article explores some of the most common problems encountered during the operation of an FTIR spectrophotometer and provides guidance for identifying and resolving them.

FTIR spectrometer

1. Low Signal-to-Noise Ratio

A frequent issue in FTIR measurements is a low signal-to-noise (S/N) ratio, which can obscure spectral features and compromise the accuracy of analysis.

Potential Causes:

Contaminated or damaged IR source

Dirty or misaligned optics

Detector degradation

Environmental interference (e.g., vibrations or temperature fluctuations)

Troubleshooting Tips:

Inspect and clean the interferometer optics, source, and mirrors.

Check the desiccant condition and replace if moisture contamination is suspected.

Ensure the instrument is placed in a vibration-free, temperature-controlled environment.

Calibrate and align the optics if necessary.

2. Weak or No Signal

Another common problem is the complete absence of signal, which typically halts measurement operations.

Potential Causes:

Burned-out IR source

Broken detector

Misaligned interferometer

Sample compartment blockage

Troubleshooting Tips:

Check whether the source is emitting IR radiation (usually visible in some models).

Verify that the detector is functioning correctly; replace if faulty.

Ensure all optical components are properly aligned and unobstructed.

Run a background scan to determine if the system is responsive without a sample.

3. Baseline Drift or Instability

Baseline instability can interfere with spectral interpretation and quantification.

Potential Causes:

Fluctuations in room temperature or humidity

Aging optical components

Electronic noise in the detector

Intermittent power supply

Troubleshooting Tips:

Allow the instrument to warm up sufficiently before use.

Check for proper grounding and stable power supply.

Replace aging components like beam splitters or detectors if baseline behavior remains erratic.

Minimize environmental changes in the lab during analysis.

4. Moisture Interference

FTIR spectrophotometers are sensitive to moisture, particularly in the mid-IR region where water absorbs strongly.

Potential Causes:

Saturated desiccants

Humid sample environment

Leaks in the instrument enclosure

Troubleshooting Tips:

Regularly inspect and replace desiccant cartridges.

Ensure the instrument housing is sealed properly.

Use dry nitrogen purging if working in high-humidity conditions.

FTIR Spectrophotometer display

5. Unusual Peaks or Artifacts in Spectra

Unexpected peaks or distortions can arise from a variety of mechanical or environmental sources.

Potential Causes:

Contamination of the sample or sample holder

Optical misalignment

Interference from CO₂ or H₂O in the air path

Instrument software or calibration errors

Troubleshooting Tips:

Clean all sample handling accessories.

Run a reference scan to determine if artifacts are due to the sample or the instrument.

Use purge gas or enclosed sample compartments to eliminate ambient interference.

Reinstall or update software if spectral processing is in error.

6. Software Communication Errors

Instrument-software communication issues can prevent measurements from starting or completing.

Potential Causes:

Faulty USB or serial connections

Corrupt software or drivers

Firmware mismatches

Troubleshooting Tips:

Check all cables and connections between the FTIR and computer.

Restart both the instrument and software.

Update or reinstall instrument drivers and firmware.

Contact technical support if hardware compatibility issues persist.

Summary

Troubleshooting FTIR spectrophotometer issues requires a systematic approach that involves checking both hardware and software components. Routine maintenance, including cleaning optics, replacing desiccants, and ensuring stable environmental conditions, can prevent many of the common problems. When issues arise, early detection and resolution not only protect the integrity of the data but also extend the instrument’s operational life. By understanding these common faults and their solutions, users can keep their FTIR systems running efficiently and reliably.

Borehole Logging vs. Well Logging: How Simulation Technologies Used for Optimizing Them

In the field of subsurface exploration, especially within oil and gas, geotechnical engineering, and hydrogeology, terms like borehole logging and well logging are often used interchangeably. While they share similarities, there are subtle distinctions in usage, context, and the goals of the data they generate. With advancements in digital simulation technologies, these logging techniques are increasingly being optimized for precision and efficiency. This article explores the differences between borehole logging and well logging, and the simulation tools that enhance their effectiveness.

Understanding Borehole Logging and Well Logging

Borehole Logging typically refers to the process of recording geological, geophysical, and sometimes geotechnical data from a borehole. It is widely used in fields such as mining exploration, geotechnical site characterization, and groundwater investigations. Borehole logging can be applied even in holes that are not converted into permanent wells.

ultrasonic borehole imaging

Well Logging, on the other hand, is more commonly associated with the oil and gas industry. It focuses on assessing formations penetrated by a well, especially to evaluate hydrocarbon-bearing zones. Well logging includes both open-hole and cased-hole logging and is crucial for reservoir characterization, completion planning, and production optimization.

Well logging

Key Differences Between Borehole Logging vs. Well Logging

Though often used interchangeably, borehole logging and well logging have distinct differences in terminology, purpose, and industry application. Both techniques involve the recording of physical, chemical, or structural properties from within a drilled hole in the Earth, yet the context and extent of their usage vary across disciplines.

Borehole logging is a broader term used in various geoscience disciplines such as hydrogeology, mining exploration, and geotechnical investigations. It is typically applied to temporary or test boreholes that are not necessarily developed into production wells. The primary goal of borehole logging is to gather geological and geophysical information about the subsurface. The measurements taken may include resistivity, natural gamma radiation, moisture content, and lithological variations. These logs are crucial for site characterization, mineral exploration, or assessing soil and rock behavior.

In contrast, well logging is most commonly associated with the oil and gas industry. It refers to the process of collecting detailed data about a wellbore that has typically been drilled for the purpose of extracting hydrocarbons. Well logging encompasses a wider range of advanced logging techniques and often occurs throughout the life cycle of a well, from exploration to production. In addition to basic physical properties, it includes measurements of porosity, permeability, fluid saturation, and pressure conditions within reservoir formations.

Another distinguishing factor lies in instrumentation. Borehole logging often employs relatively simple tools tailored to near-surface or shallow investigations, while well logging involves sophisticated electronic and nuclear tools capable of operating at great depths under high pressure and temperature.

Furthermore, borehole logs might be conducted just once during a study or survey, whereas well logging often includes repeated runs and a variety of tools over time to monitor changes in the well’s conditions. The depth, precision, and cost involved in well logging operations are generally higher due to the commercial importance of oil and gas wells.

Simulation Technologies Used for Optimization of Borehole Logging and Well Logging

1. Petrophysical Modeling Software

Oil and gas simulation tools allow users to create digital models of subsurface properties using well log data. These models simulate porosity, water saturation, and lithology to estimate reservoir quality.

2. Geomechanical Simulation

Software integrates well log data to simulate rock stress, strength, and failure points. This is particularly important for optimizing drilling trajectories and avoiding wellbore instability.

3. Synthetic Log Generation

In borehole environments where full data cannot be captured, simulators can create synthetic logs based on surrounding well information or seismic inputs. These help in estimating missing or unlogged intervals.

4. Training Simulators

Companies like Esimtech offer interactive well logging simulators that replicate logging conditions for operator training. These are critical for safety and skill development in oilfield environments.

5. Machine Learning and AI Models

Modern software integrates machine learning to simulate and predict formation properties from sparse or noisy data. These models enhance decision support in both exploration and development phases.

Open Hole Well Logging Simulator

Final thoughts

While borehole logging and well logging are rooted in the same fundamental principle of subsurface investigation, their scope, applications, and tools differ significantly. With the integration of powerful simulation technologies, these practices are evolving into more predictive and intelligent systems. From modeling formation behavior to training operators, simulations play a critical role in maximizing the value and safety of logging operations. As these technologies continue to mature, they will undoubtedly redefine how the industry approaches data acquisition and reservoir evaluation.

Exploring the Growing Trend of Interactive Plush Toys

Interactive plush toys are transforming the world of play by merging the timeless comfort of stuffed animals with the engaging capabilities of modern technology. No longer are plush toys simply passive companions; today, they can speak, sing, respond to touch, and even engage in interactive storytelling. These innovations reflect a growing trend in toy design, where emotional connection and smart play go hand in hand.

Interactive plush toy for kids

A New Era of Play

At the heart of interactive plush toys is a unique combination of softness and intelligence. Designed with built-in electronics such as voice recognition, motion sensors, and even Bluetooth connectivity, these toys are able to respond to a child’s actions and cues. Whether it’s a bear that sings when hugged, a puppy that wiggles its ears in response to a name being called, or a character that helps children learn the alphabet, the possibilities are wide and evolving.

These toys are often crafted to create a more personal and immersive experience. Some custom plush toys can be personalized to know a child’s name or favorite color, making the interaction feel more meaningful. This kind of responsiveness not only entertains but also fosters a sense of companionship and emotional comfort.

Blending Learning with Emotional Development

One of the key appeals of interactive plush toys is their potential to enhance early learning and emotional development. Children can learn to express themselves better through conversations with their toy companions, while also developing vocabulary, problem-solving skills, and memory through interactive games. These toys often adapt to a child’s developmental stage, offering activities and dialogues that grow more complex as the child matures.

For toddlers and preschoolers, the toys offer a playful gateway into foundational education—teaching shapes, numbers, songs, or even multiple languages. Meanwhile, for older children, they provide a comforting presence that can be a source of encouragement and creativity during solo play.

Interactive plush toy for child

A Fusion of Comfort and Innovation

The success of interactive plush toys lies in their ability to maintain the huggable, reassuring nature of traditional stuffed animals while offering the excitement of high-tech functionality. Parents often appreciate how these toys engage children without the need for screens, giving them peace of mind that their kids are interacting in a tactile, imaginative way.

As technology becomes more accessible and affordable, the interactivity of these toys continues to improve. Voice recognition has become more accurate, sensors more responsive, and integration with mobile apps has opened the door to a world of downloadable content, stories, and games—all from the arms of a cuddly companion.

The Future of Interactive Companions

Interactive plush toys are more than just a trend—they represent a new standard in how toys can both entertain and nurture. They cater not only to children’s desire for play but also to their emotional needs, helping them build confidence, empathy, and language skills in the process.

Interactive plush toys for dogs

As artificial intelligence and sensor technology continue to advance, the future promises even smarter plush companions capable of understanding mood, guiding meditation, or telling interactive bedtime stories. In essence, interactive plush toys are shaping a world where loveable companions are not only soft and snuggly—but also smart, supportive, and deeply engaging.

5 Key Points to Understanding A Centering Web Guide System

In industries such as printing, packaging, textiles, and battery manufacturing, the accurate positioning of moving materials—commonly known as webs—is essential. Whether it’s a roll of paper, film, foil, or fabric, even the slightest misalignment can result in material waste, machine downtime, and product defects. This is where the centering web guide system becomes an indispensable solution, designed specifically to keep the web centered as it moves through various processing stages.

S1000 Pro Type Centering Web Guide System

What Is a Centering Web Guide System?

A Centering Web Guide System is a type of automatic web alignment system that detects and corrects the lateral position of a web, keeping it aligned to a predetermined centerline. Unlike edge-guiding or line-following systems, which track the web’s edge or printed mark, the centering guide adjusts the web so that it is symmetrical around the center axis of the process line.

This system is especially useful in processes where bilateral symmetry is critical, such as laminating, slitting, or coating applications.

Key Components of a Centering Web Guide System

Sensors: Photoelectric, ultrasonic, infrared, or CCD cameras are used to detect the actual position of the web. Dual web guiding sensors placed on each side measure deviations from the center.

Controller: The web guide controller receives input from the sensors and calculates the necessary corrections. It sends signals to actuators or motors to realign the web.

Actuators: Typically, stepper motors or hydraulic/pneumatic cylinders are used to move the guide mechanism and keep the web centered.

Guide Mechanism: This may include pivoting frames, shifting rollers, or moving tables that physically adjust the web path to maintain center alignment.

controller of S1000 Pro Type Centering Web Guide System

How It Works

As the web passes through the guide system, the sensors continuously monitor the material’s position. If the web begins to drift off the centerline, the controller detects this deviation and sends correction commands to the actuators. The guide mechanism then adjusts the web path, bringing the material back to its centered position. This feedback loop ensures constant, real-time alignment with high accuracy.

Advantages of Centering Web Guide Systems

Improved Product Quality: Keeps web materials aligned, reducing defects in processes like laminating, printing, or slitting.

Reduced Waste: Minimizes material loss due to misalignment, helping lower production costs.

Higher Throughput: Allows faster line speeds with less need for manual intervention.

Consistent Symmetry: Crucial for products that require center-based accuracy, such as multilayer laminates or symmetrical packaging.

Automation Integration: Can be seamlessly integrated into fully automated production lines with centralized control systems.

Applications Across Industries

Flexible Packaging: For centering plastic film rolls during printing or lamination.

Textile Manufacturing: To ensure symmetrical coating or embossing.

Lithium Battery Production: Maintaining alignment during electrode coating or stacking.

Labeling and Wrapping: For consistent wrapping and sealing of products.

Paper Converting: Ensures centered printing or cutting in high-speed roll-to-roll applications.

Component of S1000 Pro Type Centering Web Guide System

Final Thoughts

The Centering Web Guide System plays a pivotal role in modern web-handling environments by maintaining precise material alignment. Its ability to continuously monitor and adjust web position improves operational efficiency, reduces waste, and guarantees product consistency. As industries increasingly rely on automation and precision, centering web guide systems are not just a convenience—they are a necessity for quality-driven production lines.

Exploring the Types of Marine Searchlights: How to Choose

Marine searchlights play a vital role in ensuring safety, navigation, and operational efficiency at sea. Whether mounted on commercial ships, naval vessels, fishing boats, or rescue craft, these powerful lights are designed to cut through darkness, fog, and harsh weather conditions. With various models tailored to different maritime applications, understanding the types of marine searchlights is essential for selecting the right one based on vessel size, operational needs, and environmental conditions.

TG3-AN Marine Signal Searchlight

Halogen Searchlights

Halogen searchlights have been a long-standing standard in marine lighting due to their affordability and reliability. These lights produce bright, white illumination and are widely used on small to medium-sized vessels. While they offer good performance, halogen bulbs have a shorter lifespan and higher energy consumption compared to modern alternatives. They are best suited for tasks requiring intermittent use rather than continuous operation.

Xenon Searchlights

Xenon searchlights provide an extremely powerful beam with high intensity and long range, making them ideal for large ships and critical maritime operations such as search and rescue or military patrol. The xenon arc lamp produces a bright white-blue light that can penetrate fog and darkness effectively. Although more expensive and requiring specialized components, xenon lights are favored where visibility over long distances is crucial.

LED Searchlights

LED (Light Emitting Diode) searchlights represent the most energy-efficient and long-lasting option available today. These LED searchlights have rapidly gained popularity due to their low power consumption, durability, and minimal maintenance. LED searchlights offer precise beam control, variable brightness, and instant on/off capability, making them ideal for both continuous use and emergency scenarios. They are suitable for vessels of all sizes, including modern commercial fleets and advanced patrol boats.

TZ2-A Automatic LED Marine Searchlight

Infrared (IR) Searchlights

Infrared searchlights are designed for use in conjunction with night vision systems. While they are invisible to the naked eye, they allow cameras and night vision goggles to see in total darkness. These lights are often used in surveillance, security, and military applications where covert operations are required. IR searchlights are typically mounted on naval vessels, coast guard ships, or high-security private yachts.

Remote-Controlled Searchlights

Remote-controlled marine searchlights can be adjusted in direction and beam intensity from a control panel located on the bridge or through wireless systems. These lights enhance convenience and operational safety, especially in rough weather or during nighttime navigation. Many remote-controlled units now integrate LED or xenon technology and offer features such as programmable sweep patterns or auto-park functions.

Wireless Remote Control LED Searchlight

Manually Operated Searchlights

Though less advanced, manually operated searchlights remain relevant for small vessels or applications where simplicity and cost-effectiveness are key. They are often mounted on a swivel base and require physical positioning. These are commonly found on fishing boats, recreational vessels, and backup systems on larger ships.

Choosing the Right Searchlight

Selecting the appropriate marine searchlight depends on several factors, including the size of the vessel, range requirements, power availability, and intended use. For example, a fishing trawler operating in dense fog may benefit from a xenon searchlight, while a patrol boat requiring high efficiency and long service life might opt for LED. In high-risk or security-sensitive missions, infrared or remote-controlled searchlights can provide superior operational advantages.

Summary

Marine searchlights are indispensable tools that serve as the eyes of vessels navigating dark and unpredictable waters. With a range of technologies and functionalities available—halogen, xenon, LED, IR, remote-controlled, and manual—operators can find a solution tailored to their unique maritime environment. As lighting technologies evolve, marine searchlights continue to enhance safety, visibility, and mission success at sea.

Effective Steps for Installing Cage Nuts

Cage nuts are essential fasteners used in server racks, equipment enclosures, and mounting frames to securely attach hardware while allowing easy adjustments. These nuts consist of a square nut housed in a spring steel cage, which clips into square mounting holes. Their primary advantage is their ability to accommodate different thread types while providing a secure grip for screws.

Cage Nuts

Proper installation of cage nuts ensures stable equipment mounting, reduces damage risks, and allows for easy replacement. Whether you’re assembling a server rack, industrial cabinet, or telecom enclosure, following the correct installation process is crucial for a reliable setup.

Why Use Cage Nuts?

Cage nuts offer several benefits over traditional threaded holes:

Flexibility: They allow different screw types (e.g., M6, M8, 10-32, or 12-24) to be used in universal square holes.

Replaceability: Damaged nuts can be swapped out without replacing the entire rack.

Stronger Grip: The floating nut design provides better alignment and secures heavy equipment firmly.

Vibration Resistance: The cage structure helps absorb vibrations, reducing the risk of screws loosening over time.

Cage Nut Manufacturer</p

Tools and Materials Required

Before installing cage nuts, gather the following:

Cage nuts (correct size for your rack and screws)

Cage nut insertion tool (optional but recommended for ease of installation)

Flathead screwdriver or pliers (if no tool is available)

Appropriate screws for your mounting application

How to Install Cage Nuts

1. Identify the Correct Mounting Holes

Locate the square holes in the rack or mounting frame where the equipment will be installed. Ensure they align with your hardware’s mounting points.

2. Position the Cage Nut

Hold the cage nut with the nut section facing outward and the spring tabs positioned inside the square hole.

3. Insert One Side First

Using your fingers or a cage nut tool, insert one side of the nut’s cage tabs into the hole first.

4. Compress and Snap Into Place

Press the opposite side of the cage nut’s tabs inward while pushing it into the hole. The spring tension will hold the nut firmly in place. If you’re using a cage nut tool, hook the nut, squeeze the handles, and press it into the hole for easier installation.

5. Check for Stability

Ensure the nut is securely clipped in place by gently pulling on it. The nut should stay fixed without moving or coming loose.

Custom Cage Nuts

Tips for Easier Installation

Use a cage nut tool to prevent hand injuries and reduce installation effort.

Wear gloves when handling cage nuts to avoid pinched fingers.

Plan equipment positioning before installing nuts to reduce unnecessary adjustments.

Choose the correct size for your rack (commonly M6 for server racks, 10-32 for telecom racks).

Final Words

Installing cage nuts correctly ensures secure, flexible, and durable hardware mounting in server racks and enclosures. Using the right tools and following proper techniques makes the process safe and efficient. Whether setting up IT infrastructure, industrial equipment, or audio-visual systems, cage nuts provide a reliable fastening solution that enhances rack stability and longevity.

What are Different Types of Lab Mixers: How to Choose the Right Type

Lab mixers are fundamental tools used in scientific research, pharmaceuticals, chemical processing, and material testing to ensure consistent and uniform mixing of liquids, powders, and other substances. These mixers play a crucial role in preparing solutions, emulsions, suspensions, and other mixtures required for various analytical and experimental procedures. With a range of designs and functionalities, selecting the right lab mixer depends on mixing speed, viscosity, volume capacity, and specific application requirements.

The Importance of Lab Mixers in Scientific Research

Laboratory experiments and industrial processes often require precise and controlled mixing to achieve the desired reaction, solubility, or consistency. Lab mixers are designed to meet these needs by providing efficient blending, agitation, and homogenization of different materials.

In fields such as biotechnology, pharmaceuticals, chemistry, and food science, reliable mixing is essential for:

Sample preparation for analytical testing

Chemical synthesis and reaction processes

Homogenization of biological samples

Dissolution of powders into liquids

Development of stable emulsions and suspensions

The right lab mixer ensures that materials are mixed thoroughly and reproducibly, leading to accurate and repeatable experimental results.

Types of Lab Mixers and Their Applications

Lab mixers come in various types, each suited to different applications and material properties. The choice of mixer depends on factors such as viscosity, sample volume, and the type of mixing required.

1. Magnetic Stirrers

Magnetic stirrers use a rotating magnetic field to spin a stir bar placed inside a liquid sample. They are ideal for low-viscosity liquids and small-volume applications.

LED Digital Magnetic Hotplate Stirrer MS7-H550-S

Common applications: Dissolving solutes, gentle mixing of aqueous solutions, temperature-controlled mixing when used with a hotplate.

2. Overhead Stirrers

Overhead stirrers are powerful mixers that use mechanical impellers to mix larger volumes and higher-viscosity substances.

Overhead Stirrer

Common applications: Polymer mixing, chemical synthesis, paint and ink formulation, biological suspensions.

3. Vortex Mixers

Vortex mixers create a circular motion in a small liquid volume, commonly used for quick sample mixing in test tubes and vials.

Common applications: Cell culture preparation, DNA/RNA sample mixing, protein dissolution.

Types of Vortex Mixers

4. Shakers and Rockers

Shakers and rockers use orbital, linear, or tilting motions to mix multiple samples simultaneously.

Common applications: Blood sample mixing, gel staining, enzyme reactions, microbiological culture preparation.

5. Homogenizers

Homogenizers apply high shear forces to break down particles or cell structures, producing uniform suspensions or emulsions.

Common applications: Tissue homogenization, emulsification, drug formulation, nanoparticle synthesis.

6. Ultrasonic Mixers

Ultrasonic mixers use high-frequency sound waves to break down particles and disperse substances uniformly.

Common applications: Cell disruption, nanoparticle dispersion, degassing of liquids.

Key Factors to Consider When Choosing a Lab Mixer

Selecting the right lab mixer depends on several factors that impact mixing efficiency, sample integrity, and overall experimental success.

1. Sample Volume and Viscosity

Small-volume, low-viscosity samples require magnetic stirrers or vortex mixers.

Large-volume, high-viscosity samples are better suited for overhead stirrers or homogenizers.

2. Mixing Speed and Control

Adjustable speed control is essential for applications requiring precise mixing, such as chemical synthesis or biological sample preparation.

Variable speed options allow flexibility in different mixing processes.

3. Temperature Requirements

Some experiments require heat-controlled mixing, making hotplate stirrers or temperature-controlled shakers ideal choices.

If heat-sensitive samples are involved, low-heat generating mixers like overhead stirrers are preferred.

4. Compatibility with Different Vessels

Consider the type of container being used (beakers, test tubes, flasks) to select a mixer with appropriate compatibility.

Some mixers, like vortex mixers and shakers, are designed for multi-sample processing.

5. Application-Specific Requirements

For cell culture and microbiology, gentle mixers like rockers and orbital shakers prevent cell damage.

In chemical research, high-power homogenizers and ultrasonic mixers help achieve consistent sample dispersion.

Advancements in Lab Mixer Technology

Modern lab mixers are equipped with digital controls, programmable mixing modes, and automation features to enhance efficiency and reproducibility. Some key advancements include:

Digital speed control and LCD displays for precise settings.

Programmable mixing cycles for consistent results.

Wireless and remote control for integration into automated laboratory workflows.

Improved motor technology for silent, energy-efficient operation.

Summay

Lab mixers are essential tools for precise and efficient sample preparation across various scientific and industrial applications. Choosing the right mixer involves evaluating sample properties, mixing requirements, and control options to ensure optimal performance. With advancements in digital technology and automation, modern lab mixers are now more versatile, reliable, and efficient, making them indispensable in research and production laboratories.

通过 WordPress.com 设计一个这样的站点
从这里开始