How to Implement Snubbing Units Effectively

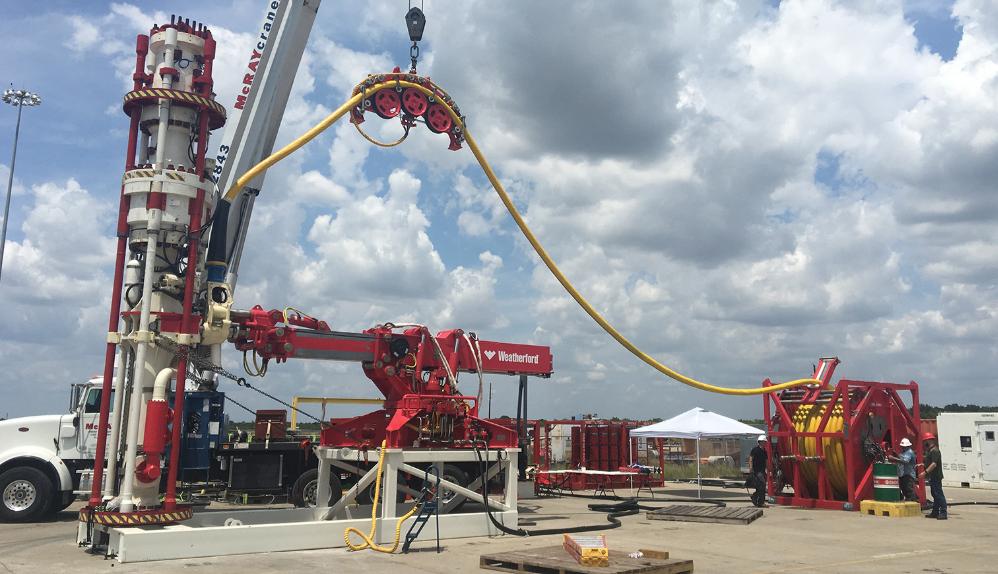
In the modern oil and gas industry, snubbing operations, where pipe is run into or pulled out of a live well under pressure, play a critical role in maintaining well integrity while maximizing safety and efficiency. However, these operations carry significant risks due to the complexity and high-pressure environments involved. Implementing snubbing units effectively requires not only the right hardware and experienced personnel but also advanced tools like snubbing simulators that enhance training, planning, and operational readiness.

1. Understand the Operational Requirements

Effective implementation begins with a clear understanding of the specific requirements of the well. This includes:

Wellbore pressure and temperature conditions

Type of intervention (e.g., fishing, milling, or workover)

Pipe sizes, lengths, and snubbing forces required

BOP configuration and rig compatibility

Accurate assessment ensures the selection of the right type of snubbing unit—hydraulic or mechanical, rig-assisted or standalone—and its proper configuration.

Snubbing Units

2. Select the Appropriate Snubbing Unit

The chosen snubbing unit should be tailored to:

Well depth and pressure

Rig site conditions (land, offshore, platform)

Mobility and deployment speed needs

For high-pressure wells, heavy-duty hydraulic snubbing units with adequate ram and annular preventers are essential. Ensure the unit has built-in redundancy and complies with API standards.

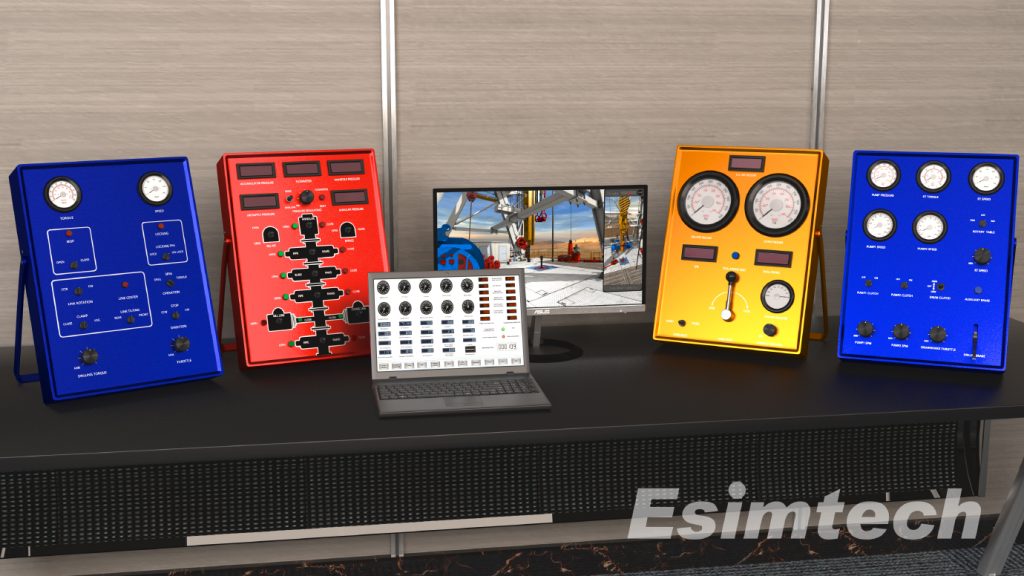
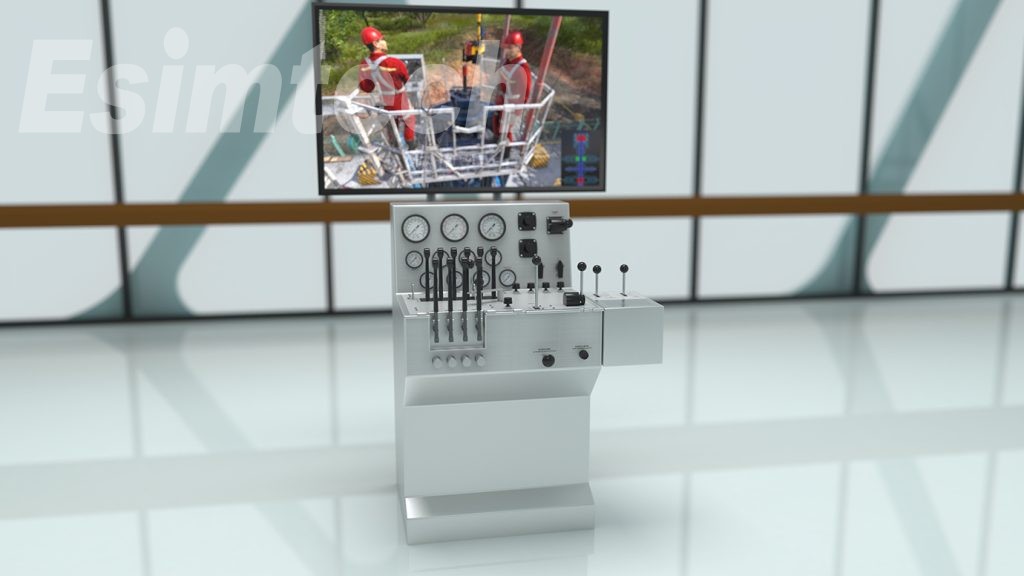
3. Integrate Snubbing Simulator for Personnel Training

A crucial step in effective implementation is realistic simulation training. Snubbing simulators replicate field conditions and allow crews to:

full size snubbing simulator

Practice well control procedures and snub/pull pipe operations

Learn force balance principles in vertical and deviated wells

Respond to simulated emergency scenarios without risk

Simulators help reduce human error, enhance coordination among crew members, and allow operators to train for rare or dangerous scenarios in a controlled setting.

Advanced snubbing simulators, like those developed by Esimtech and other industry leaders, include:

Interactive 3D environments

Real-time feedback on force application and pressure behavior

Integration with real data from previous operations

Portable Snubbing Simulator

4. Develop Standardized Operating Procedures (SOPs)

Implementing clear and comprehensive SOPs ensures consistency and safety. These should be developed in conjunction with insights from both field operations and simulator feedback.

Key SOP components include:

Equipment checklists

Step-by-step snubbing sequences

Emergency response protocols

Communication and hand signals

5. Conduct Pre-Job Planning and Risk Assessment

Prior to deployment, detailed job safety analysis (JSA) and hazard identification (HAZID) should be carried out. Simulators can support pre-job planning by running scenarios and predicting potential failure points or inefficiencies.

6. Ensure Real-Time Monitoring and Data Logging

Effective implementation continues through the operation with real-time monitoring. Parameters to track include:

Hydraulic pressure

Pipe movement and load

Wellhead pressure

Annular and ram BOP function

Modern snubbing units come equipped with digital monitoring tools that can integrate simulator data to predict mechanical fatigue or stress points during the operation.

7. Post-Operation Review and Continuous Improvement

After the operation, conduct a thorough review involving:

Simulator replays of critical operation phases

Equipment performance analysis

Crew debriefings and feedback collection

Use this information to improve future training modules, update SOPs, and identify knowledge gaps. Simulation logs can serve as valuable documentation for internal auditing and compliance verification.

Summary

Successfully implementing snubbing units in oil and gas operations demands more than just equipment. By integrating snubbing simulators into training, planning, and execution phases, operators can significantly reduce risks, increase efficiency, and ensure the crew is well-prepared for complex well interventions. With simulation technology as a backbone of the strategy, snubbing becomes not only safer but also a smarter and more controlled process.

What are Common Materials for Coil Compression Springs: How to Choose

Coil compression springs are among the most widely used mechanical components across various industries, including automotive, aerospace, medical devices, electronics, and heavy machinery. They are designed to absorb compressive forces and return to their original shape when the load is removed. The performance, durability, and reliability of these springs are highly dependent on the material used in their construction. Choosing the right material for coil compression springs is crucial to meet operational demands such as load capacity, environmental conditions, fatigue resistance, and temperature stability.

Coil Compression Spring

Importance of Material Selection

The material used in coil compression springs determines key characteristics such as strength, elasticity, corrosion resistance, temperature tolerance, and lifespan. Poor material selection can lead to early spring failure, reduced efficiency, or even safety risks in critical applications. Therefore, understanding the properties of available materials is essential to optimizing spring design and functionality.

Common Materials for Coil Compression Springs

1. Music Wire (High-Carbon Steel)

Music wire is a high-tensile, cold-drawn steel wire known for its excellent tensile strength and fatigue life. It is widely used for static and dynamic applications where consistent performance under repeated loading is required.

Pros: High tensile strength, cost-effective, excellent fatigue resistance.

Cons: Limited corrosion resistance, not suitable for high-temperature applications.

Typical Use: Automotive parts, industrial machinery, general-purpose springs.

2. Stainless Steel

Stainless steel, particularly grades like 302, 304, and 316, is known for its excellent corrosion resistance and moderate strength. It is suitable for applications where moisture, chemicals, or salt exposure is a concern.

Pros: Corrosion-resistant, non-magnetic (depending on grade), suitable for clean or humid environments.

Cons: Lower tensile strength than music wire, can be more expensive.

Typical Use: Medical equipment, food processing machinery, marine applications.

3. Phosphor Bronze

Phosphor bronze is an alloy of copper, tin, and phosphorus that offers good corrosion resistance and electrical conductivity, making it a preferred choice in electrical and electronic applications.

Pros: Good wear and corrosion resistance, excellent conductivity.

Cons: Lower mechanical strength compared to steel.

Typical Use: Electrical contacts, sensors, switch mechanisms.

4. Beryllium Copper

Beryllium copper combines high strength with excellent electrical conductivity and corrosion resistance. It also performs well in high-fatigue applications and explosive environments due to its non-sparking properties.

Pros: High strength, non-magnetic, good corrosion and fatigue resistance.

Cons: Expensive, contains toxic elements in raw form (safe when processed).

Typical Use: Aerospace, electronics, defense.

5. Chrome Silicon Steel

Chrome silicon steel is a high-performance alloy designed for high-stress and high-temperature environments. It offers excellent fatigue and impact resistance, making it ideal for heavy-duty applications.

Pros: High strength, excellent fatigue and shock resistance, withstands elevated temperatures.

Cons: Requires precise heat treatment, less corrosion resistance.

Typical Use: Automotive suspension systems, aircraft landing gear, high-load mechanisms.

6. Inconel (Nickel-Chromium Alloy)

Inconel alloys, especially Inconel X-750, are designed for extreme environments where high temperature, oxidation, and corrosion resistance are crucial.

Pros: Excellent performance in high-temperature and corrosive environments.

Cons: Very expensive, challenging to machine and form.

Typical Use: Jet engines, nuclear reactors, oil and gas applications.

Oval Coiled Compression Spring

Factors to Consider When Choosing Spring Material

Operating Environment: Exposure to moisture, chemicals, or saltwater may require corrosion-resistant materials like stainless steel or phosphor bronze.

Temperature Range: High-temperature applications demand materials such as Inconel or chrome silicon for coiled compression spring.

Load and Stress Requirements: Heavily loaded springs need materials with high tensile strength and fatigue resistance.

Cost Constraints: Budget limitations may favor music wire or standard stainless steel.

Electrical Conductivity: Applications involving electrical current benefit from materials like beryllium copper or phosphor bronze.

Certifications and Regulations: Industries like aerospace or medical may require specific material certifications and traceability.

Coil Compression Spring Supplier

Summary

Material selection is a fundamental aspect of the design of coiled compression spring that directly affects performance, lifespan, and safety. With options ranging from economical music wire to advanced alloys like Inconel, engineers must carefully assess the operating conditions and functional requirements of each application. By selecting the appropriate spring material, manufacturers can ensure reliable performance, minimize maintenance costs, and enhance overall system efficiency.

Key Differences Between Dry Baths and Water Baths in Laboratory Settings

In modern laboratories, precise temperature control is essential for a wide range of experimental procedures. Two of the most commonly used devices for heating samples are dry baths and water baths. While both serve the purpose of maintaining stable temperatures, their design, operation, and suitability vary significantly depending on the application. This article explores the key differences between dry baths and water baths, highlighting their respective advantages, limitations, and ideal use cases in laboratory settings.

Understanding the Basics

A water bath uses heated water to transfer thermal energy to samples. Samples are typically placed in sealed tubes or containers and immersed in a tank filled with water, which is maintained at a set temperature using an internal heating element and thermostat.

A dry bath, on the other hand, uses a metal block with precisely machined wells to hold tubes. The block is electrically heated, providing direct contact-based heating to the sample containers without the need for any liquid medium.

Dry Bath Incubator

Temperature Range and Precision

Water baths are generally suitable for low to moderate temperature ranges, typically up to 100°C (boiling point of water), though some models include a lid and external circulation to slightly exceed this limit. They offer even temperature distribution, especially when the water is stirred or circulated.

Dry baths often provide a wider and more precise temperature range, sometimes up to 150°C or more. The direct contact between the metal block and sample tubes allows for faster temperature ramping and tighter control, making dry baths a better choice for applications requiring high precision or elevated temperatures.

Contamination and Maintenance

One of the main differences lies in cleanliness and maintenance. Water baths, by nature, require regular cleaning to prevent algae, microbial growth, and mineral buildup. The presence of water also poses a risk of sample contamination, especially if tubes are not properly sealed.

Dry baths eliminate these concerns as they do not involve any liquid. They are generally easier to clean and maintain, and there is no risk of spillage or cross-contamination, making them ideal for sensitive applications such as DNA amplification or protein incubation.

Sample Compatibility and Flexibility

Water baths offer more flexibility with container types and shapes. Since samples are immersed, researchers can use various vessels such as flasks, beakers, or bottles. This makes water baths suitable for large-volume or irregularly shaped samples.

Dry baths, however, are limited to the sizes and shapes of the available block inserts, which are typically designed for standard microcentrifuge tubes or PCR tubes. However, modern dry baths often feature interchangeable blocks, allowing labs to adapt to different tube formats, albeit with some constraints.

Applications and Use Cases

Water Baths are commonly used for:

Thawing or warming reagents

Incubating cell cultures

Enzyme reactions at moderate temperatures

Maintaining temperature during chemical reactions

Drawell Water Baths

Dry Baths are ideal for:

PCR sample preparation

Enzyme activation or inactivation

Incubation of nucleic acid or protein samples

Heat shock treatments in molecular biology

Portability and Energy Efficiency

Dry baths are typically more compact and portable than water baths, which require a reservoir and often a lid. They also use less energy and heat up more quickly due to the absence of water mass.

Summary: Key Differences at a Glance (Without Using a Chart)

Dry baths and water baths differ significantly in how they heat samples, their precision, and their suitability for various lab applications. A dry bath uses a heated metal block to warm samples through direct contact, offering higher temperature ranges—often up to 150°C—and greater precision. In contrast, a water bath heats samples through immersion in warm water and typically operates up to 100°C, with excellent uniformity, especially when stirred.

Maintenance requirements also vary. Water baths need regular cleaning to prevent microbial growth and mineral buildup, while dry baths are easier to maintain and pose less risk of contamination since no liquid is involved. When it comes to compatibility, water baths are more flexible, accommodating various vessel shapes and sizes like flasks and beakers, whereas dry baths are limited to tube sizes that match the block insert.

Dry baths are generally more compact, portable, and energy-efficient, heating up faster than water baths. They’re ideal for precise molecular biology applications, while water baths are better suited for general-purpose laboratory tasks such as incubating cultures or enzyme reactions.

Thermostat Water Baths

Final Thoughts

Both dry baths and water baths are indispensable tools in laboratory environments, each with its unique advantages. Water baths excel in versatility and are ideal for general-purpose applications, while dry baths offer cleaner, faster, and more precise heating—especially in molecular biology and sensitive biochemical workflows. Choosing between the two depends on the specific needs of the experiment, the type of samples involved, and the desired level of temperature control. In many modern labs, having both systems available ensures maximum flexibility and efficiency in sample preparation and processing.

Effective Use of Custom High Holding Power Anchors for Specific Applications

In the demanding world of marine and offshore engineering, anchoring systems must offer not only strength but reliability in highly variable environments. High Holding Power (HHP) anchors are specifically designed to provide superior holding capacity compared to conventional anchors of the same weight. When tailored for specific applications, custom HHP anchors become essential tools in ensuring vessel and structure stability in unique operational conditions. This article explores the role of custom HHP anchors, their design considerations, and where they are most effectively used.

Why Choose Custom High Holding Power Anchors?

Standard anchors are effective under general conditions, but when faced with challenging seabeds, extreme weather, or project-specific constraints, a custom HHP anchor becomes necessary. Customization allows engineers to modify the anchor’s geometry, materials, and weight distribution to optimize holding power based on factors like soil type, load requirements, and deployment method.

Custom HHP anchors also allow integration with remote or automated deployment systems, corrosion-resistant coatings for long-term use, and features that support reusability in temporary installations.

high holding power anchor

Key Design Considerations

When developing a custom HHP anchor, several critical factors must be analyzed:

Seabed Composition: Different seabeds—such as clay, sand, gravel, or silt—respond differently to anchor shapes. Custom fluke angles and surface areas can dramatically increase performance in specific seabed types.

Load Conditions: Custom anchors are engineered to withstand anticipated loads from vessels, floating platforms, or subsea structures. Designers adjust the anchor’s geometry and weight accordingly to ensure secure holding.

Anchor Type: Whether it’s a drag embedment anchor, vertical load anchor, or suction pile anchor, the chosen high holding power anchor type depends on the application. Customization fine-tunes these base types for optimal performance.

Deployment Method: The anchor must be designed for compatibility with the vessel or equipment used for deployment. For remote or automated systems, special fittings and release mechanisms may be integrated.

Material and Coating Selection: For extended use or harsh environments, high-strength steels with anti-corrosive coatings or galvanization are often selected to ensure longevity.

Common Applications of Custom HHP Anchors

1. Offshore Oil and Gas Platforms

Custom HHP anchors provide reliable mooring for semi-submersibles, jack-up rigs, and floating production systems. These anchors must resist large horizontal and vertical loads in harsh ocean conditions.

2. Floating Wind Turbines

With the expansion of offshore wind farms, anchors must handle dynamic loading while remaining lightweight and eco-friendly. Custom designs help meet strict environmental and engineering standards.

3. Marine Construction Projects

Temporary mooring systems for barges, cranes, and pontoons often require anchors that can be installed and retrieved efficiently without sacrificing holding power.

4. Aquaculture Installations

Fish farms and underwater cages need stable mooring in often shallow but dynamic coastal environments. Custom HHP anchors are designed for easy handling, minimal seabed disruption, and strong lateral resistance.

5. Naval and Defense Applications

Military vessels and underwater detection equipment require compact but powerful anchoring systems that can be deployed quickly and hold securely under stealth or tactical operations.

high holding power anchor

Advantages of Customization

Performance Optimization: Tailored anchors offer better holding power per unit weight.

Cost Efficiency: Custom anchors reduce the need for over-sizing and excess material.

Deployment Flexibility: Adapted for specific equipment or vessel configurations.

Environmental Compatibility: Designed to minimize seabed disturbance.

Long-Term Durability: Materials and coatings suited to project lifespan and conditions.

TW type pool HHP anchor

Summary

Custom high holding power anchors are critical in ensuring safe, efficient, and reliable anchoring across a variety of specialized marine and offshore applications. By considering environmental conditions, structural demands, and deployment logistics, customized anchor solutions provide unmatched security and adaptability. As offshore operations expand and evolve, the need for precisely engineered HHP anchors will only continue to grow—ensuring stability, safety, and sustainability beneath the surface.

The Use of Wireless Remote Controlled Marine Searchlights

In today’s maritime industry, reliable and flexible lighting plays a critical role in ensuring operational safety and navigation precision—especially during low-visibility conditions. Wireless remote-controlled marine searchlights have emerged as a powerful solution, combining intense illumination with the convenience of remote operation. From fishing boats and ferries to coast guard patrol vessels and luxury yachts, these advanced marine searchlights are transforming how marine professionals approach visibility challenges on water.

What Are Wireless Remote-Controlled Marine Searchlights?

Wireless remote-controlled marine searchlights are high-intensity lighting devices mounted on vessels that can be controlled via a wireless remote unit, often from the bridge or deck. Unlike traditional manual spotlights or wired control systems, these searchlights allow operators to pan, tilt, and adjust the beam direction and intensity from a distance—without physical wiring constraints.

Most systems use radio frequency (RF) or infrared (IR) communication to transmit control signals, offering real-time directional adjustment with minimal delay. Some advanced models even include Bluetooth, Wi-Fi, or app-based smartphone control, pushing the boundaries of functionality.

Wireless Remote Control LED Searchlight

Key Features and Capabilities

360° Rotation and Multi-Axis Tilt

Operators can scan the surrounding area effortlessly with full horizontal rotation and vertical tilt, enabling comprehensive coverage.

High-Intensity LED or Halogen Bulbs

These wireless remote control LED searchlights often feature powerful LED beams (sometimes exceeding 200,000 candela), offering long-range visibility with low power consumption and long service life.

Weather-Resistant Construction

Built with IP66–IP68-rated materials, these lights are sealed against saltwater, rain, and corrosion, ensuring reliable operation in harsh marine environments.

Programmable Beam Patterns

Some systems allow beam width and strobe settings to be adjusted remotely for signaling, search, or rescue operations.

Multiple Control Points

Systems can be controlled from several locations using multiple remotes or control consoles—a critical advantage on large or multi-deck vessels.

Preset Memory and Auto-Homing

Premium models include preset aiming positions and home return functions, improving speed and efficiency during repetitive tasks.

SD-3 Wireless Remote Controlled LED Searchlight

Applications in Marine Operations

Navigation Assistance: Enhances visibility when approaching docks, navigating narrow channels, or avoiding floating debris.

Search and Rescue (SAR): Facilitates quick scanning and illumination of large areas during emergencies or man-overboard situations.

Security and Surveillance: Allows discreet observation of surrounding areas in potentially hostile or high-risk waters.

Fishing and Trawling: Illuminates gear deployment zones or surface activity during night operations.

Recreational Use: Offers convenience and safety for private boats and yachts when docking or anchoring at night.

Advantages of Wireless Control

Ease of Installation: No long wiring harnesses needed—simplifies integration even on retrofitted vessels.

Operational Flexibility: Allows single-person operation from any location within range, including handheld remotes and helm-mounted units.

Reduced Maintenance Risk: Less physical wiring means fewer corrosion-prone electrical points and lower maintenance needs.

Enhanced Safety: Operators can remain under cover or at a safer location while directing the beam during hazardous tasks.

Things to Consider Before Purchasing

Range and Signal Strength: Ensure the wireless control range suits the vessel size and layout. Metal hulls may impact signal strength—look for dual antenna or boosted systems if needed.

Mounting Location: Opt for elevated positions that avoid shadows or obstructions, and allow a clear line of sight for rotation.

Power Source: Check voltage compatibility (12V/24V/AC) and current draw, especially on smaller vessels with limited power supply.

Regulatory Compliance: Confirm that the searchlight meets IMO or coastal authority standards for marine safety equipment.

Summary

Wireless remote-controlled marine searchlights represent a significant step forward in maritime lighting solutions. By combining powerful illumination, directional precision, and remote convenience, they enhance safety, efficiency, and usability across a wide range of marine applications. As vessel operators seek smarter, more flexible tools for night operations, these searchlights stand out as indispensable assets on modern waters. Whether you’re navigating commercial waters or enjoying a night cruise, a wireless marine searchlight ensures you’re never left in the dark.

Best Practices for Embroidering on a Stuffed Animal

Embroidering on a stuffed animal is a creative and heartfelt way to personalize a gift or add artistic flair to a plush toy. Whether you’re stitching a child’s name on a teddy bear’s paw or embellishing a bunny’s ear with a sweet message, embroidery transforms a mass-produced toy into a treasured keepsake. With a little patience and the right tools, even beginners can master this charming craft.

Why Embroider on a Stuffed Animal?

Embroidering on a plush toy adds uniqueness and emotional value. Custom embroidered stuffed animals are perfect for:

Birth announcements

Holiday gifts

Wedding or proposal keepsakes

Brand promotions

Memorial tributes

Unlike printed tags or stickers, embroidery offers a durable, tactile, and timeless personalization that doesn’t fade or peel.

Embroider on a Stuffed Animal

Choosing the Right Stuffed Animal

Not all plush toys are created equal when it comes to embroidery. Choose a stuffed animal that:

Has a smooth, stable surface (short-pile fur is easier to work with)

Includes areas with minimal stuffing (like ears, paws, or bellies)

Can be flattened or opened up for stitching

Has a removable stuffing insert (if using a machine embroidery hoop)

Popular choices include teddy bears, bunnies, elephants, and dogs with floppy limbs or large ears.

Hand Embroidery vs. Machine Embroidery

You can embroider a stuffed animal by hand or with an embroidery machine, depending on your tools and design complexity.

Hand embroidery allows for free-form creativity and flexibility. It’s ideal for small names, hearts, or simple messages on curved surfaces like paws or tails.

Machine embroidery offers speed and precision. It’s best for detailed logos or longer text, but may require unstuffing and re-stuffing the animal for hoop access.

Tools You’ll Need

Embroidery thread (cotton or polyester)

Embroidery needle (sharp with a large eye)

Embroidery stabilizer (tear-away or water-soluble, especially for machine embroidery)

Embroidery hoop (optional but helpful for flattening the surface)

Fabric marking pen or chalk

Small scissors or thread snips

Pins or clips

Common Issues and Solutions for Embroidering on Stuffed Animals

Steps for Hand Embroidering on a Stuffed Animal

Choose and prepare your design

Decide what you want to stitch (e.g., a name, date, heart). Lightly mark the placement using a washable fabric pen.

Stabilize the area

Slide a piece of stabilizer behind the fabric if possible. This helps prevent puckering.

Thread your needle

Use 2–3 strands of embroidery floss for fine details. Tie a small knot at the end.

Start stitching

Use simple stitches like backstitch, satin stitch, or chain stitch. Begin from the underside and work slowly to avoid puckering or pulling the fabric.

Secure and finish

Tie off the thread securely and hide the knot inside the toy. Trim any excess.

Miniature Stuffed Animals

Tips for Success

Practice first on a scrap piece of felt or plush to test stitch spacing and tension.

Work gently—plush fabric can stretch or shift.

Keep it small—large designs are harder to manage on curved surfaces.

Use contrasting threads to make your design pop, or choose subtle colors for a softer look.

When to Consider Professional Help

If you’re creating embroidered stuffed animals for retail or bulk gifting, it may be worth partnering with a custom plush manufacturer or embroidery service with machine embroidery capabilities. They can help ensure consistency, durability, and production efficiency.

Summary

Embroidering on a stuffed animal is a wonderful way to infuse personality, emotion, and creativity into a beloved plush. Whether it’s a single name for a newborn or a message stitched into a wedding bear, the handmade element adds warmth that no machine alone can replicate. With the right tools and a bit of care, you can turn any stuffed animal into a one-of-a-kind companion filled with meaning and charm.

The Growing Attetion of VOGE DS625X as s an Accessible ADV Motorcycle

P>As the popularity of adventure motorcycles continues to rise, more manufacturers are stepping up to offer versatile models that cater to both new riders and experienced travelers looking for practical, all-around options. The VOGE DS625X is one such model—designed to fill the gap between lightweight dual-sport machines and larger, more expensive adventure tourers. With its bold styling, capable performance, and impressive feature set, the DS625X is gaining attention as an accessible ADV bike for the modern rider.

Design and Positioning

The VOGE DS625X is crafted with a focus on versatility and approachability. It carries the signature adventure styling—tall windscreen, upright seating, high ground clearance, and wire-spoke wheels. Designed to tackle mixed terrain, it combines the rugged aesthetics of larger adventure motorcycles with the nimbleness and manageability of a mid-sized machine.

This model is particularly appealing for riders who want the adventure look and functionality without committing to a heavyweight bike. Whether navigating city streets, gravel roads, or scenic backcountry routes, the DS625X is built to perform without overwhelming newer or smaller-statured riders.

VOGE DS625X

Engine and Performance

At the heart of the DS625X is a single-cylinder, liquid-cooled engine, tuned for broad usability across different riding conditions. With a displacement of approximately 625cc, the bike delivers smooth, tractable power that’s ideal for both highway cruising and low-speed control on trails. The torque curve favors mid-range performance, making it suitable for carrying luggage or a passenger without losing responsiveness.

Its manageable power output, combined with a lightweight chassis, makes the DS625X a forgiving and predictable machine—especially valuable for newer riders exploring long-distance or dual-sport riding for the first time.

Suspension and Handling

The DS625X is equipped with long-travel suspension, offering confidence over uneven terrain and absorbing imperfections on poor road surfaces. The front end typically features a telescopic or USD fork, while the rear uses a mono-shock setup, both designed to handle a mix of tarmac and dirt routes.

With a 21-inch front wheel and 18-inch rear wheel, the DS625X provides off-road geometry without sacrificing on-road stability. These wheel sizes, combined with dual-purpose tires, offer good grip and control whether you’re on paved mountain passes or loose gravel trails.

Features and Technology

VOGE has incorporated modern features into the DS625X to enhance the ride experience:

Full-color TFT display with digital readouts for speed, gear position, and fuel economy

LED lighting for better visibility and energy efficiency

Optional ABS, ensuring safety on both pavement and loose surfaces

Adjustable windscreen to improve rider comfort on long journeys

Rear luggage rack and pannier mounts for touring versatility

These features make the DS625X a functional platform for extended travel, especially when paired with aftermarket accessories like panniers, crash bars, and GPS navigation systems.

VOGE DS625X Motorcycle

Target Market and Affordability

The VOGE DS625X is clearly aimed at the mid-range ADV motorcycle market—riders who want real adventure capability without the complexity or cost of larger models like the BMW GS series or Honda Africa Twin. It’s a particularly attractive option for:

Beginner to intermediate riders looking to enter the adventure segment

Commuters who want a more upright and commanding ride position

Weekend explorers interested in occasional off-road ventures

Its competitive pricing undercuts many premium rivals while delivering respectable quality and performance. For those who prioritize value without compromising on core adventure functionality, the DS625X is a strong proposition.

Summary

The VOGE DS625X reflects a smart balance of form and function, offering authentic adventure-bike aesthetics, real-world capability, and approachable performance. As more riders in Europe and Asia look for versatile motorcycles that can handle both daily duties and spontaneous escapes into the countryside, the DS625X provides a well-rounded and cost-effective solution. Whether you’re venturing into the world of ADV riding or looking for a compact yet capable touring companion, the DS625X is ready for the road ahead.

Why Bamboo Toilet Paper Become a Sustainable Alternative to Traditional Toilet Paper

In an age where sustainability and environmental consciousness are becoming central to consumer choices, bamboo toilet paper has emerged as an eco-friendly alternative to conventional toilet paper made from virgin wood pulp. Combining performance, comfort, and environmental responsibility, bamboo toilet paper is rapidly gaining popularity as a practical step toward greener living.

Bamboo Toilet Paper Supplier

The Environmental Problem with Traditional Toilet Paper

Traditional toilet paper is typically manufactured from hardwood trees such as eucalyptus or spruce. The production process often involves:

Deforestation – Millions of trees are cut down annually to meet global toilet paper demand, contributing to habitat destruction, carbon emissions, and biodiversity loss.

High Water and Energy Usage – Manufacturing traditional toilet paper requires large quantities of water and energy, placing strain on natural resources.

Chemical Processing – Bleaching and chemical softening introduce pollutants that can affect both water systems and human health.

As consumers and corporations seek to reduce their ecological footprint, bamboo has surfaced as a viable, low-impact resource for essential paper goods.

Why Bamboo?

Bamboo is a fast-growing, renewable grass that can grow up to 3 feet per day in optimal conditions. Unlike trees, it regenerates from the same root system after harvesting, eliminating the need for replanting. This gives bamboo several sustainability advantages:

Rapid Growth – Matures in 3–5 years compared to 20–50 years for trees.

Minimal Land Degradation – Grows in diverse environments without exhausting soil.

Low Water Usage – Requires significantly less water than tree-based crops.

No Pesticides – Typically grows without the need for chemical pesticides or fertilizers.

Bamboo Toilet Paper

Benefits of Bamboo Toilet Paper

Eco-Friendly Production

Bamboo toilet paper is often produced with fewer chemicals and less energy than traditional alternatives, making it a more environmentally responsible choice.

Biodegradable and Septic-Safe

It breaks down quickly in water, reducing the risk of clogged plumbing and being ideal for septic systems.

Softness and Strength

Modern bamboo toilet paper rivals traditional brands in softness and durability, often being two-ply or three-ply to ensure a comfortable user experience.

Hypoallergenic Properties

Free from dyes, fragrances, and harsh chemicals, bamboo toilet paper is gentle on sensitive skin and ideal for people with allergies or sensitivities.

Challenges and Considerations

While bamboo toilet paper offers many advantages, there are still factors to consider:

Cost – Bamboo toilet paper is generally more expensive than conventional options due to smaller production scales and transportation costs (as most bamboo is grown in Asia).

Availability – Although growing in popularity, it may not yet be widely available in all regions.

Packaging – Some brands still use plastic packaging, which may offset some of the environmental benefits.

Bamboo Toilet Paper Roll

Wrap Up

Bamboo toilet paper represents a thoughtful shift toward sustainable living. As more consumers prioritize eco-friendly choices and the market matures, the availability and affordability of bamboo-based hygiene products are expected to improve. By choosing bamboo toilet paper, individuals can make a small but impactful contribution to reducing deforestation, conserving water, and promoting a more sustainable future—one roll at a time.

Key Differences Betwwen 100% Inspection and Sampling Inspection in the Printing Operations

In the highly competitive and quality-driven printing industry, ensuring flawless output is critical. From high-speed packaging lines to security printing and commercial labels, print defects can lead to significant economic losses, brand reputation damage, or even legal consequences. To prevent such outcomes, printers deploy inspection strategies—primarily categorized into 100% inspection and sampling inspection. Each method has its strengths and trade-offs, and understanding their differences is essential for selecting the right quality control approach for specific printing operations.

What is 100% Inspection?

100% inspection in the printing operations involves continuously scanning every inch of the material using advanced camera-based vision systems. These systems are capable of detecting a wide range of defects in real time, such as misregistration, color deviations, smudges, streaks, missing prints, and text errors. This method is commonly used in applications where zero defects are acceptable, such as:

precision 100% print inspection system

Pharmaceutical packaging

Security printing (e.g., banknotes, stamps)

High-value consumer product labels

Food and beverage labels with regulatory requirements

Advantages of 100% Inspection:

Complete Defect Coverage: Every printed element is scrutinized, ensuring maximum quality assurance.

Real-Time Error Detection: Operators are instantly alerted to defects, allowing immediate correction or stopping the press.

Traceability and Reporting: Detailed inspection logs provide documentation for audits and customer assurance.

Minimized Waste Risk: Early detection prevents long runs of defective prints, reducing rework and material loss.

Limitations of 100% Inspection:

High Initial Investment: Advanced vision systems and data processing hardware are expensive.

Complex Integration: Installation and calibration require skilled personnel and system compatibility.

Data Overload: Managing and interpreting large volumes of inspection data demands robust infrastructure.

What is Sampling Inspection?

Sampling inspection involves checking a subset of printed materials at defined intervals during production. Operators may manually examine a few sheets or use offline tools to assess critical parameters such as alignment, color consistency, and print clarity.

This method is suitable for:

Lower-volume print runs

Jobs where minor defects are tolerable

Operations where cost sensitivity is high

Advantages of Sampling Inspection:

Lower Cost: Requires less sophisticated equipment and simpler workflows.

Faster Setup: Quick to implement with minimal training or configuration.

Sufficient for Non-Critical Jobs: Appropriate where occasional minor errors do not impact usability or brand perception.

Sampling Inspection in Printing

Limitations of Sampling Inspection:

Missed Defects: Intermittent checks may overlook defects occurring between samples.

Inconsistent Results: Relies heavily on human judgment, leading to variability in detection.

Delayed Corrections: Defects may persist unnoticed for a significant number of prints.

Comparing 100% Inspection and Sampling Inspection in the Printing Industry

100% inspection involves continuously monitoring the entire print job using high-speed vision systems that scan every part of every printed piece in real time. This method ensures that no defect, however minor, escapes detection. The printing inspection system is particularly suited for high-value or high-risk applications such as pharmaceutical packaging, security printing, and regulatory-compliant labels. The primary advantage of 100% inspection is its ability to guarantee comprehensive coverage—every defect is detected, traced, and documented. Operators receive immediate feedback, allowing for quick corrective actions and minimizing the production of defective materials. However, this level of assurance comes with higher costs, including investment in sophisticated equipment, software, and skilled technical support. Additionally, it can generate vast amounts of data that require efficient processing and storage systems.

100% printing quality inspection system

On the other hand, sampling inspection relies on evaluating selected samples from a print run at set intervals. This method is much simpler and more cost-effective to implement. It typically involves manual checks or the use of basic offline measurement tools. Sampling is best suited for lower-risk jobs, short-run projects, or applications where minor inconsistencies are tolerable. Its biggest advantage lies in reduced upfront costs and operational simplicity. However, the trade-off is a significantly higher risk of undetected defects. Since only a portion of the output is examined, any defects that occur outside the sample points may go unnoticed, leading to quality escapes and potential customer complaints. Additionally, because sampling inspection often depends on human judgment, results can vary between operators and over time.

Choosing the Right Inspection Strategy

Selecting between 100% inspection and sampling inspection depends on several factors:

Product Criticality: Mission-critical applications demand 100% inspection, while aesthetic-only jobs may tolerate sampling.

Customer Expectations: Contracts with strict quality clauses or traceability requirements favor full inspection.

Budget Constraints: For startups or cost-sensitive projects, sampling may be a viable starting point.

Production Volume: Higher volumes amplify the risks of undetected defects, making 100% inspection more justifiable.

Regulatory Requirements: Industries governed by strict compliance rules often mandate full inspection protocols.

Final Thoughts

Both 100% inspection and sampling inspection have vital roles in the printing industry. While 100% inspection offers unmatched quality assurance and is ideal for high-stakes applications, sampling inspection provides a cost-effective solution for less critical jobs. Ultimately, the best inspection strategy balances risk, cost, and operational demands—sometimes even combining both methods within a hybrid quality control framework. As printing technology advances, more companies are leaning toward 100% inspection systems, driven by automation, AI-enhanced defect recognition, and the demand for zero-defect manufacturing.

Key Technological Advancements in Oil and Gas Drilling

The oil and gas industry is undergoing a transformative phase, driven by the increasing need to enhance drilling efficiency, reduce operational risks, and minimize environmental impacts. New technologies in oil and gas drilling, particularly those involving automation, advanced materials, and simulation, are playing a pivotal role in this transformation. This article explores some of the most significant technological advancements reshaping modern drilling operations.

1. Automation and Digitalization of Drilling Operations

Automation has emerged as a cornerstone in modern drilling. Automated drilling systems (ADS) are being increasingly adopted to handle repetitive and dangerous tasks, thereby reducing human error and increasing operational safety. These systems use real-time data analytics and machine learning algorithms to make informed decisions regarding weight on bit (WOB), rate of penetration (ROP), and rotary speed.

Automated Drilling Rigs

Digital twins—a digital replica of physical drilling systems—are now used to monitor performance, predict failures, and optimize well trajectories. Integrated with cloud computing platforms, these digital tools allow remote operations centers to supervise drilling activity across multiple sites simultaneously.

2. Rotary Steerable Systems (RSS) and Smart Drill Bits

Traditional directional drilling methods have limitations in achieving precise wellbore placement. Rotary Steerable Systems (RSS) enable continuous rotation of the drill string while steering the bit, allowing for smoother boreholes and faster drilling rates. Combined with smart drill bits embedded with sensors, these systems can send back real-time formation data to improve geosteering accuracy and decision-making.

3. Managed Pressure Drilling (MPD)

Managed Pressure Drilling (MPD) is a revolutionary technique designed to precisely control the annular pressure profile during drilling. This method mitigates common drilling issues like kicks, lost circulation, and formation damage. MPD is particularly beneficial in narrow pressure margin environments, such as high-pressure high-temperature (HPHT) wells.

Managed Pressure Drilling

4. Extended Reach and Multilateral Drilling

Extended Reach Drilling (ERD) and multilateral wells are designed to access multiple reservoirs from a single wellbore, thereby reducing surface footprint and improving reservoir contact. These complex well architectures require advanced planning and real-time monitoring tools, which are now made possible by enhanced downhole telemetry systems and high-fidelity modeling software.

5. Simulation Technology

Oil and gas simulation technology has become an integral part of planning, training, and optimizing drilling operations. It allows operators to model complex scenarios and test various outcomes before executing them in the field.

a. Training and Skill Development

Sophisticated drilling simulators replicate real-world drilling conditions, enabling personnel to undergo realistic training without the risks associated with live operations. These simulations cover scenarios such as well control emergencies, equipment malfunctions, and geomechanical responses.

Portable Drilling Simulators

b. Drilling Engineering and Design

Simulation platforms like reservoir and wellbore simulators help in designing optimal drilling paths and predicting reservoir behavior. These tools incorporate geophysical, petrophysical, and mechanical data to provide accurate forecasts on drilling performance and reservoir productivity.

c. Real-Time Decision Support

Live simulations, fed by real-time downhole sensor data, offer predictive insights and help in proactive decision-making. For example, if a simulation indicates potential torque and drag issues, engineers can adjust the drilling parameters instantly to avoid complications.

  1. Advanced Materials and Downhole Tools

The integration of high-strength, corrosion-resistant materials in drill strings and downhole tools has improved the durability and performance of equipment under extreme conditions. Technologies like expandable tubulars and high-temperature elastomers are enhancing reliability and reducing downtime.

7. Environmental and Remote Monitoring Technologies

New drilling technologies are increasingly focused on sustainability. Zero-discharge systems, improved blowout preventers (BOPs), and real-time emissions monitoring tools are helping companies adhere to stricter environmental regulations. Additionally, satellite and drone-based remote sensing systems provide accurate geological and surface data for site selection and logistics.

Summary

The convergence of automation, intelligent tools, and simulation technologies is ushering in a new era of oil and gas drilling. These innovations are not only improving the safety and efficiency of drilling operations but also enabling the industry to address increasingly complex geological formations and operational environments.

通过 WordPress.com 设计一个这样的站点
从这里开始