Operating web guide system equipment can pose significant hazards if not handled with care. To protect operators and maintain a safe working environment, it’s imperative to prioritize safety measures. This article outlines key strategies for enhancing safety in web guide system operations.
1. Comprehensive Training and Education
Regular training: Ensure all operators receive thorough training on equipment operation, safety procedures, and emergency response.
Ongoing updates: Provide regular refresher courses to keep operators informed about new safety protocols and equipment advancements.
2. Rigorous Maintenance
Regular inspections: Conduct routine inspections to identify and address potential hazards, such as wear and tear or malfunctions.
Emergency stop buttons: Make emergency stop buttons easily accessible and clearly marked.
Protective guards: Install protective guards around moving parts to prevent accidents.
Sensors and alarms: Utilize sensors and alarms to detect potential issues and provide timely alerts.
4. Safe Work Environment
Clear signage: Post clear and visible warning signs to indicate potential hazards.
Adequate lighting: Ensure proper lighting to prevent accidents caused by poor visibility.
Organized workspace: Maintain a clean and organized workspace to reduce the risk of slips, trips, and falls.
5. Personal Protective Equipment (PPE)
Appropriate gear: Provide and require operators to wear appropriate PPE, such as safety glasses, gloves, and protective clothing.
Regular inspection: Ensure PPE is in good condition and replace damaged items promptly.
6. Standard Operating Procedures (SOPs)
Clear guidelines: Develop and enforce SOPs for equipment operation, maintenance, and emergency procedures.
Risk assessment: Conduct regular risk assessments to identify and mitigate potential hazards.
7. Emergency Preparedness
Emergency plans: Create and practice emergency plans, including evacuation routes and first aid procedures.
Regular drills: Conduct regular emergency drills to ensure operators are prepared to respond effectively in case of an incident.
8. Continuous Monitoring and Feedback
Monitoring systems: Implement systems to monitor equipment performance and identify potential safety issues.
Feedback mechanisms: Encourage operators to report safety concerns and provide feedback for improvement.
9. Ergonomics
Ergonomic design: Design workstations and controls to minimize strain and discomfort.
Regular breaks: Encourage operators to take regular breaks to prevent fatigue and reduce the risk of injuries.
10. Compliance and Standards
Regulatory compliance: Ensure compliance with all relevant safety regulations and standards.
Internal audits: Conduct regular safety audits to identify and address compliance issues.
By implementing these strategies, organizations can create a safer working environment for operators and reduce the risk of accidents and injuries associated with web guide system equipment.
Square head bolts, also known as square head machine bolts or square head screws, are essential fasteners used in a wide range of applications. Their distinct square-shaped head sets them apart from other bolt types, offering unique advantages in specific scenarios. This article will delve into the materials used to manufacture square head bolts and explore their diverse applications across various industries.
Materials Used in Square Head Bolts
Square head bolts are produced using a variety of materials, each selected based on the specific requirements of the application. The choice of material directly influences factors such as strength, corrosion resistance, weight, and cost. Here are some commonly used materials:
Carbon Steel: This is the most common material due to its widespread availability, excellent strength, and cost-effectiveness. Different grades of carbon steel, such as low-carbon steel (Grade 2), medium-carbon steel (Grade 5), and high-carbon steel (Grade 8), are used depending on the application’s demands.
Stainless Steel: Stainless steel bolts offer exceptional corrosion resistance, making them ideal for use in environments exposed to moisture or corrosive elements. Common stainless steel grades include 18-8 (e.g., 304 or 316).
Brass: Brass bolts are known for their aesthetic appeal and corrosion resistance. They are often used in decorative projects and outdoor applications.
Aluminum: Aluminum bolts are lightweight and suitable for applications where weight reduction is crucial, such as in the aerospace and automotive industries.
Bronze: Bronze bolts offer excellent strength and corrosion resistance, making them a popular choice for marine and outdoor applications.
Titanium: Titanium bolts provide an exceptional strength-to-weight ratio and excellent corrosion resistance, making them suitable for demanding environments like aerospace and medical implants.
Copper: Copper bolts are primarily used in electrical applications due to their excellent electrical conductivity.
Nickel Alloys: Nickel alloy bolts are known for their high-temperature and corrosion resistance, making them suitable for industries like aerospace, chemical processing, and power generation.
Applications of Square Head Bolts
Square head bolts are versatile fasteners used in numerous industries, including:
Construction: Timber construction, heavy machinery, and bridge building.
Transportation: Railroad and automotive industries.
Marine: Marine structures, fittings, and equipment.
Historical Restoration: Preserving the charm of historical buildings.
Polarimetry, a valuable analytical technique, measures the optical rotation of polarized light to provide insights into a substance’s chemical composition, concentration, and structure. Various types of polarimeters exist, each tailored to specific applications and requirements. This article explores these different types, their significance, and key factors to consider when selecting the most suitable polarimeter.
Types of Polarimeters
Simple Polarimeters: These are basic polarimeters often used in educational settings and introductory experiments. They typically consist of a polarizer, a sample tube, and an analyzer.
Manual Polarimeters: More advanced than simple polarimeters, manual instruments require manual adjustment of the polarizer and analyzer angles for precise measurements.
Automatic Polarimeters: Utilizing advanced technology, these instruments automate the polarizer and analyzer positioning, enhancing accuracy and reducing human error.
Digital Polarimeters: Combining automation with digital data acquisition and processing, digital polarimeters offer quick, consistent results and are ideal for applications requiring precision and repeatability.
In-line and Process Polarimeters: Designed for continuous monitoring in industrial settings, these polarimeters are integrated into production processes for real-time data on substance optical properties.
Multi-Wavelength Polarimeters: For substances exhibiting varying optical rotations at different wavelengths, these polarimeters enable measurements across multiple wavelengths, enhancing analysis specificity.
Ellipsometry: While not a polarimeter per se, ellipsometry measures changes in the polarization state of reflected light, providing complementary information to polarimetric data.
Key Factors for Polarimeter Selection
Application and Purpose: Determine the specific application and goals of using the polarimeter.
Accuracy and Precision: Consider the required level of precision and accuracy for measurements.
Sample Characteristics: Evaluate the nature of the samples to be analyzed, including their optical properties.
Throughput and Speed: Assess the necessary throughput and speed for measurements.
Ease of Use: Consider the user-friendliness of the polarimeter, especially for those with varying levels of expertise.
Cost Considerations: Balance the required capabilities with the available budget.
Environmental Conditions: Consider the operating environment of the polarimeter, including temperature, humidity, and other factors.
Calibration and Maintenance: Assess the frequency and ease of calibration and maintenance.
Future Expandability: Consider potential future needs and the polarimeter’s ability to accommodate them.
By carefully considering these factors, you can select the most appropriate polarimeter for your specific application and ensure reliable, accurate measurements.
As climate change alters the marine landscape, it significantly impacts the design, functionality, and usage of life jackets. This article explores how climate change is influencing marine life jackets and the necessary adaptations to enhance their effectiveness.
1. Changing Ocean Conditions and Life Jacket Design
Climate change has led to more extreme weather events, including stronger storms, rising sea levels, and changing ocean currents. These altered conditions necessitate life jackets that can withstand more intense and unpredictable environments. Traditional life jacket designs may no longer be sufficient in providing the necessary buoyancy and durability in rougher seas.
Increased Buoyancy Requirements: Climate change is affecting water salinity and temperature, impacting life jacket buoyancy. Modern designs incorporate smart foam technology and hybrid buoyancy systems to ensure optimal support in various conditions.
Durability in Extreme Weather: To withstand stronger storms and harsh conditions, life jackets are being made with abrasion-resistant materials and corrosion-resistant components.
2. Adaptation to Rising Sea Levels
Rising sea levels pose a direct challenge to marine safety. Life jackets must be designed to remain effective in environments where they may be submerged for longer periods or used in floodwater scenarios.
Flood-Resistant Designs: Life jackets are being designed to perform well in coastal and inland flood scenarios, incorporating features like rapid inflation mechanisms and better water drainage systems.
Visibility Enhancements: High-visibility colors, reflective materials, and built-in lighting systems are being incorporated to improve visibility in adverse conditions.
3. Integration of Advanced Technology for Enhanced Safety
Climate change has increased the need for life jackets that incorporate advanced technology. These innovations aim to improve rescue operations and ensure individuals are quickly located and recovered in emergencies.
GPS and Communication Systems: GPS trackers and communication devices can send distress signals directly to rescue teams, especially crucial in severe weather conditions.
Temperature Regulation Features: Insulating materials and thermal reactive fabrics help regulate body temperature, protecting the wearer from hypothermia or heat exhaustion.
Smart Sensors and Automation: Integrated sensors and automated features provide real-time data and automated responses in emergency situations.
4. Environmental Considerations in Life Jacket Manufacturing
Climate change has spurred a focus on the environmental impact of life jacket production. There is a growing movement towards using sustainable materials and manufacturing processes.
Eco-Friendly Materials: Biodegradable and recyclable materials are being used to reduce environmental impact.
Sustainable Manufacturing Processes: Companies are adopting greener manufacturing processes to minimize emissions and waste.
As ocean conditions continue to evolve, marine life jackets must adapt to meet the new challenges posed by climate change. By incorporating advanced technology, improving durability, and embracing sustainable practices, the marine industry is working to ensure that life jackets remain an effective and essential tool for survival.
The contemporary world relies heavily on the oil and gas industry to fuel industrialization, power transportation, and generate electricity. Both crude oil and natural gas, categorized as fossil fuels, play pivotal roles as primary energy sources on a global scale.
Crude oil, a naturally occurring liquid resource, is utilized in the production of gasoline, jet fuels, and various petroleum-based products. Natural gas, a gaseous state hydrocarbon, is abundant in the United States, often found in porous rock formations like shale. It contributes significantly to the nation’s total energy consumption. The transportation of oil, its byproducts, and natural gas is facilitated through an extensive network of pipelines across the country.
Both natural gas and crude oil are acquired through distinct drilling methods: onshore and offshore. This article will delve into the fundamental aspects of these two methods, exploring the processes involved and examining the advantages and disadvantages associated with each approach.
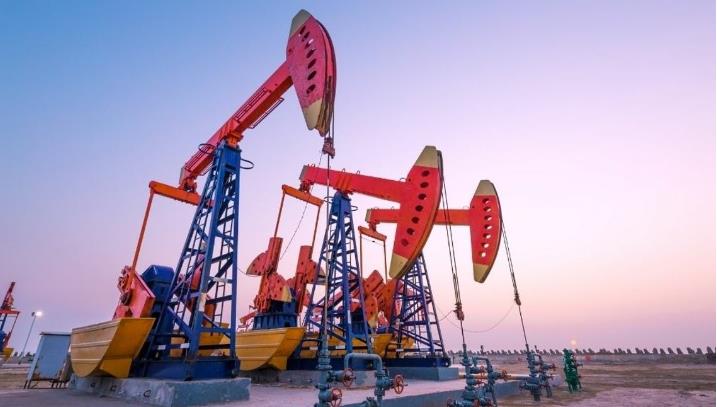
Onshore Oil Drilling
Onshore oil drilling involves extracting oil and gas from land-based deposits. This process utilizes drilling rigs to bore deep into the earth, reaching reservoirs of these valuable resources. While crucial for meeting current energy demands, onshore drilling’s impact necessitates careful consideration.
The environmental footprint of onshore oil drilling is undeniable. Land disturbance, water contamination, air and noise pollution are all potential consequences, requiring responsible management practices. Additionally, the social impact on communities, including concerns about land rights, cultural heritage, and health, needs to be addressed.
Stringent regulations govern onshore drilling activities to ensure environmental protection, worker safety, and responsible resource extraction. Advancements in technology, such as horizontal and directional drilling techniques, offer solutions to minimize environmental impact and improve safety standards.
However, the long-term future of onshore oil drilling faces challenges. Climate change concerns and the transition towards renewable energy necessitate a re-evaluation of our reliance on fossil fuels. As renewable energy sources become increasingly viable and cost-effective, the demand for onshore drilling may decrease.
Offshore Oil Drilling
Offshore oil drilling involves extracting oil and gas from beneath the seabed. It requires setting up platforms or drilling rigs in the ocean to tap into underground reservoirs, providing a significant portion of the world’s oil and gas needs.
However, offshore oil drilling faces significant environmental challenges. Accidental spills, leaks, and equipment failures can cause devastating consequences for marine ecosystems, polluting delicate habitats and harming wildlife. The exploration and production process can also disrupt sensitive ecosystems and contribute to noise pollution.
Balancing the need for energy resources with environmental protection is a major concern. Strict regulations govern offshore drilling activities, requiring environmental impact assessments, safety protocols, and contingency plans for spill response. Technological advancements, such as subsea wellhead systems and improved drilling techniques, aim to minimize environmental risks.
The future of offshore oil drilling is uncertain. As renewable energy sources become increasingly viable and the world strives to achieve carbon neutrality, the demand for fossil fuels may decrease. However, in the near future, offshore oil drilling is likely to remain an important source of energy, requiring careful management and continuous efforts to minimize its environmental footprint.
Simulation Training: A Vital Tool
Drilling simulation training system plays a crucial role in both onshore and offshore drilling operations. By providing trainees with a safe and controlled environment to practice various procedures and emergency scenarios, simulation training can enhance skills, reduce risks, improve efficiency, and be more cost-effective than traditional training methods.
Conclusion
The choice between onshore and offshore drilling depends on various factors, including the location of oil and gas reserves, environmental considerations, and economic feasibility. By understanding the key differences between these two drilling methods, we can make more informed decisions about our energy future.
Web tension control is crucial for industries processing materials like paper, film, foil, and textiles. Consistent tension ensures high-quality output, reduces waste, and optimizes production efficiency. Tension amplifiers play a pivotal role in these systems by enhancing the accuracy and stability of tension measurements. This article delves into the benefits and best practices for integrating tension amplifiers into web tension control systems.
Understanding Web Tension Control
Web tension control involves managing the force applied to a continuous web of material during processing. Precise control prevents issues like wrinkling, stretching, and tearing, which can compromise product quality and lead to increased waste. Effective web tension control systems often employ a combination of sensors, amplifiers, and controllers.
The Role of Tension Amplifiers
Tension amplifiers enhance signals from tension sensors or load cells, converting mechanical force into precise electrical signals. These signals are used by control systems to adjust and maintain the correct tension. Tension amplifiers are crucial for accurate and reliable web tension control, especially in complex and high-speed production environments.
Compatibility: Ensure compatibility with existing sensors, controllers, and actuators.
Calibration and Maintenance: Establish a regular calibration schedule and implement maintenance routines.
Environmental Factors: Select industrial-grade amplifiers designed to withstand harsh conditions.
Signal Quality: Utilize shielded cables, proper grounding, and amplifiers with built-in filtering.
Flexibility and Scalability: Choose amplifiers with adjustable settings and consider future expansion.
Training and Expertise: Invest in comprehensive training programs for staff.
Cost and Budget: Conduct a cost-benefit analysis to balance initial investment with long-term operational costs.
Solutions for Successful Integration
Comprehensive System Assessment: Evaluate the existing system to identify compatibility issues and plan accordingly.
Customization and Configuration: Select amplifiers with customizable settings to match specific needs.
Robust Design and Durability: Choose amplifiers with rugged enclosures, temperature compensation, and vibration resistance.
Advanced Signal Processing: Opt for amplifiers with advanced signal processing capabilities.
Regular Training and Updates: Implement ongoing training programs for personnel.
Long-Term Support and Service: Establish a relationship with the manufacturer or supplier for support and service.
Conclusion
Integrating tension amplifiers into web tension control systems offers numerous benefits, including enhanced accuracy, improved stability, and seamless integration with modern control systems. By addressing the considerations outlined in this article, industries can achieve precise and reliable web tension control, ensuring high-quality output and optimized production efficiency.
Garage doors are integral to our daily routines, offering convenience, security, and protection for vehicles and belongings. However, a key component that often goes unnoticed in the smooth operation of these doors is the garage door tension springs. These springs play a crucial role in ensuring that the garage door operates safely and efficiently. For homeowners looking to understand the significance of garage door tension springs and the steps involved in replacing them, this guide provides a step-by-step overview. Before delving into the replacement process, let’s first explore what these springs are and their essential role in the functionality of your garage door.
What Are Garage Door Tension Springs?
Garage door tension springs, commonly referred to as garage door springs or simply door springs, are vital components of a garage door system. These tightly wound coils are typically mounted above the garage door, either parallel to the header or horizontally above the door tracks. Their main function is to counterbalance the weight of the garage door, making it easier to open and close manually or with a garage door opener.
There are two main types of tension springs used in garage doors:
Torsion Springs:
Torsion springs are commonly found in modern garage door systems. They are mounted horizontally above the door opening on a metal shaft. When the door is closed, the springs are under tension, storing mechanical energy. As the door opens, the springs unwind, releasing their stored energy to lift the door and balance its weight.
Extension Springs:
Extension springs are typically found in older garage door systems. These springs are mounted vertically on both sides of the garage door, parallel to the door tracks. When the door is closed, the extension springs stretch under tension. As the door opens, the tension in the springs helps lift the door and counterbalance its weight.
The tension provided by these springs is critical for the safe and controlled operation of the garage door. By counterbalancing the door’s weight, tension springs prevent it from slamming shut or crashing to the ground, making it easier to lift manually and reducing strain on the garage door opener motor.
Functions of Garage Door Tension Springs
Garage door tension springs serve several key functions that are vital to the proper functioning and safety of the door:
Counterbalance the Weight:
The primary function of tension springs is to offset the weight of the garage door. Without these springs, lifting or lowering the door would be challenging and potentially dangerous.
Facilitate Smooth Operation:
Tension springs enable smooth movement of the garage door along its tracks during opening and closing. They prevent the door from slamming shut, ensuring controlled and safe movement.
Minimize Strain on the Opener:
For automated garage doors, tension springs reduce the strain on the garage door opener motor, allowing it to operate efficiently and extending its lifespan.
Enhance Safety:
Properly functioning tension springs contribute to the overall safety of the garage door system by preventing sudden, uncontrolled movements that could cause injuries or property damage.
Extend System Lifespan:
By reducing the effort required to operate the door, tension springs help prolong the lifespan of other components like the tracks, hinges, and cables.
Support Door Balance:
Tension springs maintain the balance of the garage door, preventing operational issues and misalignment.
Enable Manual Operation During Power Outages:
In the event of a power outage, tension springs allow the garage door to be operated manually, ensuring access to the garage in emergencies.
How to Replace Garage Door Tension Springs
Replacing garage door tension springs can be a challenging and potentially dangerous task, so it’s important to proceed with caution and follow safety guidelines. Although it is generally recommended to hire a professional garage door technician for this task, experienced DIY enthusiasts with the necessary skills and tools can attempt the replacement themselves. However, improper handling of these springs can lead to serious injuries.
Important Safety Precautions:
Disconnect Power:
Before starting, disconnect the garage door opener from the power source and lock the door in the down position to prevent accidental opening.
Wear Safety Gear:
Always wear appropriate safety gear, including eye protection and heavy-duty gloves.
Use Correct Tools:
Ensure you have the correct tools and equipment. Attempting to replace springs without the right tools can be extremely dangerous.
Steps to Replace Garage Door Tension Springs:
Identify the Type of Springs:
Determine whether your garage door has extension springs or torsion springs.
Release Tension (For Extension Springs):
For extension springs, release the tension by unhooking them from the track hangers and slowly lowering the door.
Remove Old Springs:
Carefully remove the old springs from their mounting brackets, noting their specific locations and orientations.
Install New Springs:
Install the new springs in the same position as the old ones, following the manufacturer’s instructions.
Reattach Hardware:
Securely reattach the springs to their brackets, ensuring proper alignment.
Adjust Spring Tension:
For extension springs, adjust the tension equally on both sides to maintain balance.
Test the Door:
Manually test the door’s operation to ensure smooth opening and closing.
Lubricate Moving Parts:
Apply a silicone-based lubricant to all moving parts, including springs, rollers, and hinges.
Conclusion
Garage door tension springs are essential for the safe and efficient operation of your garage door. These tightly wound coils counterbalance the door’s weight, making it easy to lift and lower with minimal effort. While replacing these springs is possible for experienced DIY enthusiasts, it is important to remember that mishandling them can result in serious injuries. If you are unsure about the process or lack the necessary expertise, it is best to leave the task to professional garage door technicians who can safely and effectively perform the replacement.
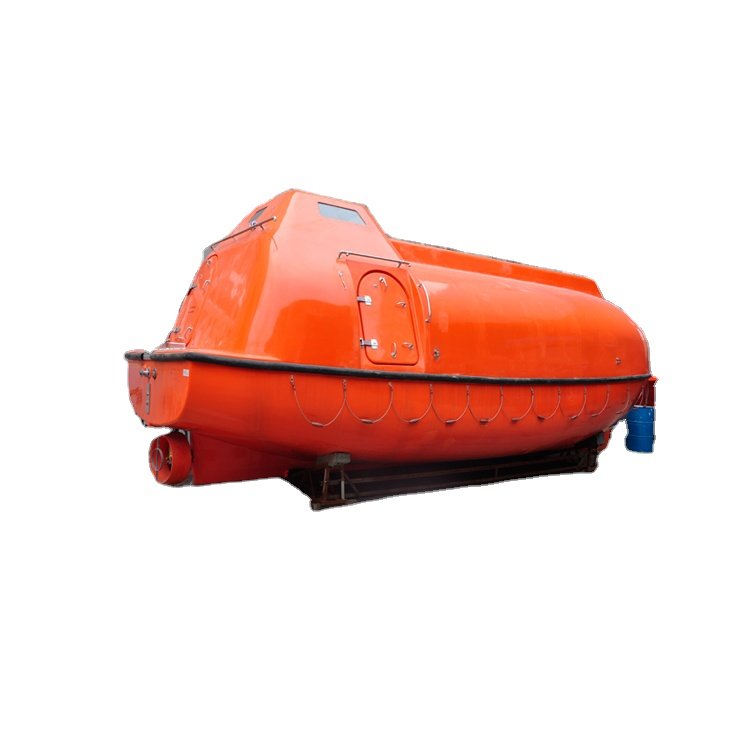
Lifeboats are essential safety devices on ships, designed to ensure the survival of crew members and passengers during emergencies. While safety is of utmost importance, the maritime industry also needs to manage costs effectively. Implementing cost-efficient solutions in marine lifeboats is crucial for upholding safety standards while controlling expenses in the maritime sector.
Key Strategies for Cost-Effective Marine Lifeboats
1. Innovative Materials and Design
a. High-Strength Lightweight Materials
Utilizing high-strength, lightweight materials such as reinforced fiberglass, aluminum alloys, and advanced composites can significantly reduce the weight of lifeboats. These materials are not only durable but also require less maintenance, leading to long-term savings.
Cost Benefits: Lighter materials decrease fuel consumption during operations, and their durability reduces the frequency and cost of repairs.
b. Modular Design
Lifeboats with modular designs allow for easy assembly, disassembly, and repairs. This approach simplifies the manufacturing process and reduces labor costs.
Cost Benefits: Modular components can be replaced individually, reducing the need for complete overhauls and minimizing downtime for repairs.
c. Simplified Hull Shapes
Simplifying the hull shape of lifeboats can reduce production costs by minimizing manufacturing complexity. Streamlined shapes also improve hydrodynamic performance, lowering fuel consumption during towing or deployment.
Cost Benefits: Reduced manufacturing complexity leads to lower production costs, while improved efficiency reduces operational expenses.
2. Efficient Production Techniques
a. Automation in Manufacturing
Incorporating automation in lifeboat production, such as robotic welding and automated assembly lines, can significantly reduce labor costs and increase production speed.
Cost Benefits: Automation ensures consistent quality, fewer errors, and lower labor costs, resulting in cost-effective production.
b. Bulk Purchasing and Standardization
Standardizing components across different marine lifeboat models and purchasing materials in bulk can lead to substantial cost savings. This strategy also simplifies inventory management and reduces lead times.
Cost Benefits: Bulk purchasing reduces material costs, and standardization lowers production and maintenance expenses.
c. Outsourcing and Collaboration
Outsourcing certain components or collaborating with specialized suppliers can reduce costs while maintaining high quality. By focusing on core competencies, manufacturers can achieve economies of scale.
Cost Benefits: Leveraging the expertise and economies of scale of specialized suppliers reduces production costs without compromising quality.
3. Low-Maintenance Features
a. Corrosion-Resistant Coatings
Applying advanced corrosion-resistant coatings to lifeboat surfaces and components can extend their lifespan and reduce the need for frequent maintenance.
Cost Benefits: Reduced maintenance frequency and extended lifeboat life lead to lower long-term costs.
b. Simple Mechanical Systems
Lifeboats equipped with simple, robust mechanical systems are less prone to failure and easier to repair. Reducing the complexity of these systems lowers both initial and ongoing maintenance costs.
Cost Benefits: Simpler systems reduce the likelihood of costly breakdowns and simplify repairs, leading to cost savings.
c. Durable Seating and Interiors
Using durable, easy-to-clean materials for seating and interiors reduces wear and tear, minimizing the need for replacements and cleaning.
Cost Benefits: Long-lasting interiors reduce the frequency of refurbishments and lower overall maintenance costs.
4. Energy-Efficient Technologies
a. Solar-Powered Systems
Integrating solar-powered lighting and communication systems into lifeboats reduces reliance on batteries or fuel-based power sources, lowering operational costs.
Cost Benefits: Solar power reduces energy costs and extends the life of onboard power systems, decreasing the need for frequent replacements.
b. Low-Emission Engines
Equipping lifeboats with low-emission, fuel-efficient engines reduces fuel consumption and operating costs while meeting environmental regulations.
Cost Benefits: Fuel-efficient engines lower fuel expenses and help avoid penalties for non-compliance with emission standards.
c. Hybrid Power Systems
Hybrid power systems combining traditional engines with electric motors offer cost-effective propulsion while reducing fuel consumption and emissions.
Cost Benefits: Hybrid systems provide long-term savings on fuel and maintenance and may qualify for environmental incentives.
5. Lifecycle Cost Management
a. Total Cost of Ownership (TCO) Analysis
Conducting a TCO analysis helps maritime operators understand the full cost implications of different lifeboat models, including purchase price, maintenance, fuel, and operational costs over the boat’s lifecycle.
Cost Benefits: TCO analysis enables more informed purchasing decisions, potentially leading to significant long-term savings.
b. Refurbishment and Upgrading
Refurbishing existing lifeboats or upgrading them with modern safety features can be more cost-effective than purchasing new ones. Upgrades may include installing new communication systems, retrofitting engines, or adding safety enhancements.
Cost Benefits: Refurbishment extends the service life of lifeboats and reduces the need for large capital expenditures.
c. Leasing and Financing Options
Exploring leasing or financing options can spread the cost of lifeboats over time, allowing operators to manage their budgets while still accessing high-quality equipment.
Cost Benefits: Leasing reduces upfront costs and provides flexibility to upgrade to newer models as needed.
Conclusion
Implementing cost-effective solutions in marine lifeboats involves a combination of innovative design, efficient production techniques, low-maintenance features, and energy-efficient technologies. These strategies not only benefit the bottom line but also enhance the overall safety and sustainability of marine operations.
Enzyme-Linked Immunosorbent Assay (ELISA) is a powerful technique in life sciences, enabling researchers to detect and quantify various substances, such as proteins, antibodies, and hormones. To fully leverage this technique, incorporating an ELISA reader into your workflow is essential. This guide explores the key aspects of using an ELISA reader to achieve accurate and efficient results.
ELISA is a widely used assay for detecting and quantifying proteins, antibodies, or antigens in a sample. The results are obtained through a series of carefully executed steps, including incubation, washing, and the addition of specific reagents. To ensure reliable outcomes, following a systematic approach is crucial.
How to Use an ELISA Reader: A Step-by-Step Guide
Prepare Your Samples:
Start by collecting and preparing your samples according to established protocols.
Ensure uniformity in sample preparation, including proper dilutions to stay within the assay’s linear range.
Plate Loading:
Accurately dispense your samples into the microplate wells.
Include appropriate controls, such as standards and blanks, to establish a reliable reference for measurements.
Incubation:
Allow the reaction to proceed by placing the microplate in an incubator.
Follow recommended incubation times and temperatures to promote optimal binding.
Washing:
Thoroughly wash the microplate wells to remove unbound substances.
Consistent and meticulous washing is vital to minimize background noise and enhance the signal-to-noise ratio.
Add Detection Reagents:
Introduce detection reagents, such as enzyme-linked antibodies or substrates, to generate a measurable signal.
Adhere to recommended concentrations and incubation times for these reagents.
Reading the Plate:
Insert the microplate into the ELISA reader.
Select the appropriate detection wavelength and set the reader to measure absorbance.
Record the readings for each well, ensuring alignment with your assay’s calibration curve.
Data Analysis:
Use the recorded absorbance values to calculate concentrations based on your standard curve.
Apply statistical analysis to validate the reliability of your results.
Tips for Optimal Performance When Using an ELISA Reader
Calibration:
Regularly calibrate your ELISA reader using standards to maintain accuracy.
Follow the manufacturer’s guidelines for calibration procedures.
Maintenance:
Keep your ELISA reader clean and well-maintained to prevent contamination.
Regularly inspect and clean the optics and ensure the instrument is functioning correctly.
Quality Control:
Include quality control samples in each assay to monitor the consistency of your results.
Promptly investigate and address any deviations to identify potential sources of error.
Data Documentation:
Maintain comprehensive records of your experimental setup, reagent lots, and instrument settings.
Document any deviations from the standard protocol.
Conclusion
Mastering the use of an ELISA reader is a skill that develops with practice and understanding. By following these steps and paying close attention to detail, researchers can fully harness the potential of ELISA readers, ensuring the accuracy and efficiency of their experiments. As technology advances, becoming proficient in using instruments like the ELISA reader remains crucial to driving scientific discovery and innovation.
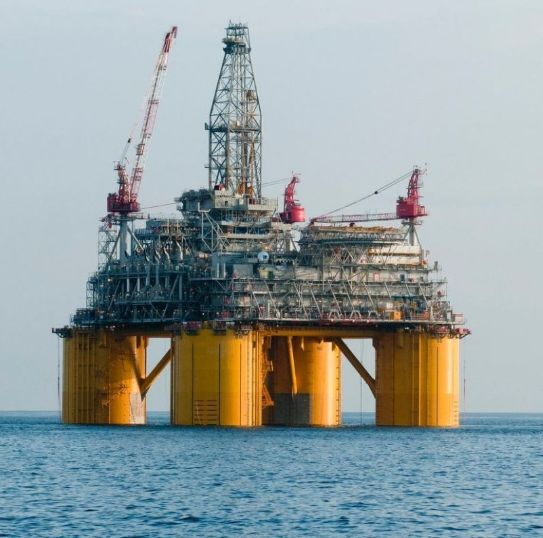
Offshore platforms are colossal structures that serve as the backbone of the global oil and gas industry, enabling the extraction of valuable hydrocarbon resources from beneath the ocean floor. These engineering marvels are a testament to human ingenuity, combining cutting-edge technology with precision design and a deep understanding of the challenges posed by the marine environment. This article explores the world of offshore platforms, delving into their functions, types, and design considerations.
Functions of Offshore Platforms
Offshore platforms play several essential roles in the oil and gas industry:
Drilling and Production: These platforms host drilling rigs and other equipment necessary for extracting hydrocarbons from the seabed. They provide a stable base for underwater drilling operations and house facilities for processing oil and gas.
Storage: Many offshore platforms are equipped with storage tanks for temporarily holding extracted oil and gas before they are transported to onshore facilities.
Living Quarters: Some platforms offer accommodations for personnel working on-site, including living quarters, kitchens, and recreational facilities.
Common Types of Offshore Platforms
Offshore platforms are categorized into various types, each designed to meet specific needs and environmental conditions:
Fixed Platforms:
Jacket Platforms: These steel structures have vertical legs (jackets) that extend to the seafloor. Jacket platforms are widely used in shallow to moderate water depths, offering stability and durability.
Gravity-Based Platforms: Massive concrete structures that rely on their weight to remain anchored to the seafloor. These platforms are suitable for shallow water locations and support drilling and production activities.
Floating Platforms:
Tension Leg Platforms (TLPs): Floating structures connected to the seafloor by vertically tensioned tendons, designed for deepwater use with excellent stability in rough seas.
Spar Platforms: Cylindrical, deep-draft floating structures anchored to the seafloor, ideal for deepwater applications with a slender profile.
Semi-Submersibles: Buoyant platforms that partially submerge in water, providing stability. Often used for drilling operations, they can be easily relocated.
Compliant Towers: Tall, slender structures designed to sway with the waves while maintaining stability. These towers are used in deepwater environments, especially in hurricane-prone areas.
FPSOs (Floating Production Storage and Offloading): Vessels equipped with oil and gas processing facilities, moored to the seabed in deepwater areas. Floating Production Storage and Offloading units store and process hydrocarbons before transferring them to shuttle tankers or pipelines.
Wellhead Platforms: Typically smaller, these platforms focus on housing wellheads and initial processing equipment. They are often used alongside larger production platforms or FPSOs.
Subsea Production Systems: In certain cases, traditional platforms are replaced by subsea production systems, where wellheads and processing equipment are placed on the seabed, with extracted hydrocarbons transported directly to shore via pipelines.
Artificial Islands: In some regions, particularly in shallow waters, artificial islands are constructed to serve as drilling and production hubs. Built from sand and rock, these islands can support various facilities.
Design Considerations for Offshore Platforms
Designing offshore platforms is a complex, highly specialized process that requires careful consideration of multiple factors to ensure the safety, reliability, and functionality of these structures.
Environmental Conditions:
Water Depth: The platform type is determined by the water depth at the location, with different designs required for shallow, deepwater, or ultra-deepwater operations.
Weather and Wave Conditions: Platforms must be designed to withstand extreme weather, including storms, high winds, and waves, with design parameters based on historical weather data.
Seismic Activity: In earthquake-prone regions, platforms are engineered to withstand seismic forces, considering factors like ground motion response and seabed liquefaction potential.
Seabed Conditions:
Seabed Stability: The type and stability of the seabed (e.g., soft mud, sand, rock) influence the platform’s foundation design and anchoring methods.
Geotechnical Surveys: Detailed surveys assess seabed conditions, informing foundation design and pile installation.
Safety Regulations and Standards:
Industry Standards: Platforms must adhere to region-specific safety and design standards, covering structural integrity, fire, and explosion protection.
Regulatory Compliance: Compliance with local, national, and international regulations ensures worker safety and environmental protection.
Structural Design:
Materials: Material selection is crucial to ensure durability and corrosion resistance in the harsh marine environment, with common choices including high-strength steel and corrosion-resistant alloys.
Structural Integrity: Advanced oil and gas modeling and simulation techniques assess the platform’s structural integrity under various loads, including wave forces, wind, and equipment weight.
</p
Environmental Impact Mitigation:
Oil Spill Contingency: Platforms are equipped with systems to contain and respond to oil spills, including booms, skimmers, and emergency plans.
Emission Controls: Technologies are implemented to minimize air emissions and reduce environmental impact.
Operational Efficiency:
Layout and Functionality: The platform’s layout is designed for efficient operations, including drilling, production, and processing, with careful arrangement of wellheads, equipment, and living quarters.
Maintenance Access: The design prioritizes easy access for routine maintenance and inspections.
Cost Efficiency:
Project Economics: Engineers balance initial construction costs with long-term operational efficiency and maintenance, striving for cost-effectiveness while maintaining safety and reliability.
Decommissioning Planning: Future decommissioning, including equipment and structure removal, is considered during the design phase.
Environmental Impact Assessment:
Ecological Impact: The impact on the local marine ecosystem and wildlife is assessed, with some platforms becoming artificial reefs, positively impacting biodiversity.
Cultural and Social Impact: The social and cultural effects on nearby communities are considered in project planning and stakeholder engagement.
Conclusion
Offshore platforms are essential for the exploration and extraction of valuable energy resources from the ocean floor. These structures, whether fixed or floating, are precision-engineered to withstand harsh environmental conditions while complying with stringent safety and environmental regulations. Despite the economic benefits and environmental challenges they pose, offshore platforms continue to play a vital role in meeting global energy demands and driving innovation in the offshore industry.


 </p
</p