Creating custom stuffed animals of your pet can be a heartwarming way to celebrate your furry friend or remember them fondly. Whether you want to commemorate a pet that has passed or just have a fun replica to enjoy, these personalized plush toys are a popular and special keepsake. Here’s what you need to know about getting a custom stuffed animal made of your pet.
1. How Custom Pet Stuffed Animals Work
Custom stuffed animals are made by transforming photos of your pet into a 3D plush toy. Companies that specialize in this service typically use high-quality fabrics and detailed craftsmanship to mimic your pet’s fur color, texture, and unique markings.
2. Steps to Ordering a Custom Plush
Choose a Company: Look for a reputable company that specializes in custom stuffed animals. Popular ones include Cuddle Clones, Petsies, and Budsies.
Submit Photos: You’ll need to provide clear, high-resolution images of your pet from different angles. The more details you can show, the more accurate the plush will be.
Customization Options: Some companies offer options to customize size, pose, and expression to make your stuffed animal even more lifelike.
Approve the Design: Depending on the company, you might receive a preview of your custom design for final approval before production begins.
3. Production and Delivery Time
Since these custom plush animals are handmade, production can take anywhere from 2 to 8 weeks. Expedited services might be available for an additional fee if you need your stuffed animal sooner.
4. Materials and Quality
Most custom pet replicas are made using high-quality, hypoallergenic plush fabric, with detailed embroidery for features like eyes and nose. The stitching and fabric choice ensure the stuffed animal is durable and captures your pet’s likeness as realistically as possible.
5. Why People Love Custom Pet Plush Toys
Keepsakes and Memorials: For pet owners who have lost a beloved animal, a custom stuffed animal can be a comforting keepsake.
Gifts: These plush replicas make thoughtful gifts for birthdays, holidays, or any occasion for pet lovers.
Decor and Collectibles: Some owners enjoy displaying custom plush toys as part of their home decor or as a collectible item.
6. Cost Considerations
The price for a custom stuffed animal of your pet can range from $100 to $300 or more, depending on factors such as size, customization level, and company reputation. While this can be a significant expense, the level of craftsmanship and personalization often justifies the cost for those seeking a unique tribute to their pet.
7. Tips for the Best Results
Choose High-Quality Photos: Make sure the photos you submit show your pet in natural light and from different angles for the most detailed replica.
Communicate Details: If your pet has specific features like scars, unique fur patterns, or a favorite pose, make sure to share these details with the company.
Review Company Policies: Always check the company’s return policy and read reviews to ensure you’re getting the best service.
Custom stuffed animals of your pet are more than just plush toys; they’re sentimental representations of the pets we love. Whether for comfort, nostalgia, or fun, these custom creations make a perfect addition to any pet lover’s collection.
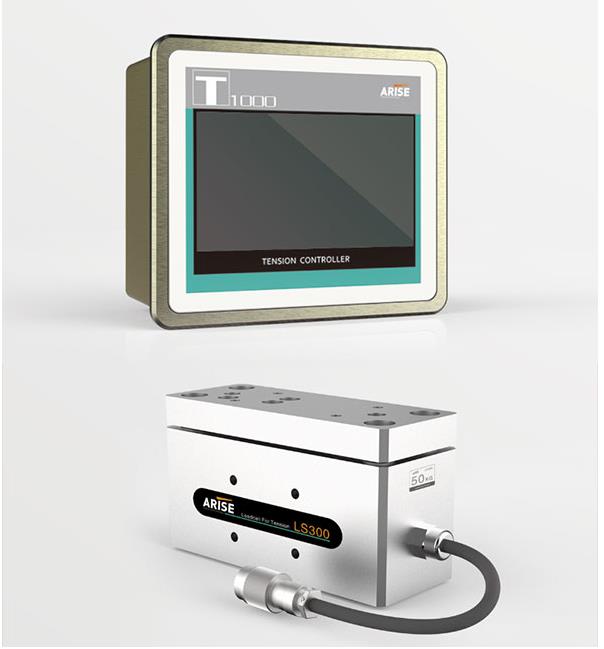
A closed-loop tension control system is a sophisticated approach to maintaining consistent tension in various industrial processes, such as in printing, packaging, textile manufacturing, and converting operations. Tension control is crucial in these processes as fluctuations can lead to product defects, machine malfunctions, and waste, ultimately affecting productivity and quality. In a closed-loop system, feedback mechanisms continuously monitor and adjust tension in real-time, allowing for precise control and adaptability to changing conditions. This article explores the working principles, benefits, applications, and advancements in closed-loop tension control systems.
How a Closed-Loop Tension Control System Works
In a closed-loop tension control system, sensors measure the actual tension in the material, providing real-time data to a controller. The controller compares this data with a pre-set desired tension and makes automatic adjustments as needed to maintain consistent tension. This closed-loop feedback process allows the system to respond quickly to changes in material properties, machine speed, and external forces, keeping tension stable throughout the operation.
Key Components of a Closed-Loop Tension Control System
Sensors: Sensors, such as load cells, dancer arms, or ultrasonic sensors, monitor the material’s tension or position. These tension sensors provide accurate feedback to the controller.
Controller: The tension controller is the system’s brain, receiving data from the sensors and calculating any deviation from the target tension. Based on this calculation, it sends commands to adjust tension accordingly.
Actuators: Actuators, such as brakes, clutches, or servo motors, make physical adjustments to maintain the correct tension by either increasing or decreasing the tension force.
Feedback Mechanism: This mechanism enables continuous monitoring and adjustment, creating a closed-loop system where the tension is constantly fine-tuned.
Benefits of Closed-Loop Tension Control
The precision offered by closed-loop tension control is essential in industries where maintaining consistent tension is critical to product quality and process efficiency. Key benefits include:
Enhanced Product Quality: By maintaining stable tension, closed-loop systems prevent issues such as wrinkling, stretching, and tearing of materials, resulting in high-quality finished products.
Reduced Waste: Fluctuating tension can lead to material damage and waste. Closed-loop control minimizes these issues, reducing waste and lowering costs.
Increased Efficiency: The system’s ability to respond to changes in real time reduces downtime due to manual adjustments or corrective actions.
Extended Equipment Life: Maintaining steady tension reduces mechanical wear and tear on equipment, extending its lifespan and lowering maintenance costs.
Versatility Across Materials: Closed-loop systems can be configured for various materials, from paper and film to fabric and metal, making them adaptable to different industrial applications.
Applications of Closed-Loop Tension Control Systems
Closed-loop tension control systems have become essential in industries where precise control over tension is required. Here are a few major applications:
Printing and Converting Industries: Tension control is crucial in printing to avoid misalignment and color overlap. Converting operations, such as cutting and laminating, also benefit from consistent tension to ensure precision.
Textile Manufacturing: Textile production processes, including weaving, knitting, and dyeing, require consistent tension to prevent fabric distortion and achieve uniform patterns and colors.
Packaging Industry: In packaging, particularly in flexible packaging and labeling, maintaining tension prevents material deformation and ensures precise placement.
Metal and Foil Processing: Metal sheets and foils require controlled tension during rolling, cutting, and coating to ensure accuracy and prevent damage.
Battery and Electronics Manufacturing: As industries like battery manufacturing use delicate films and foils, closed-loop tension control systems are essential to prevent tearing and wrinkling during the coating, cutting, and assembly stages.
Advanced Features in Modern Closed-Loop Tension Control Systems
With advancements in automation and digital technology, closed-loop tension control systems have evolved, offering enhanced features for precision and adaptability:
Automated Calibration: Modern systems include automated calibration routines, reducing setup time and ensuring consistent tension settings between production runs.
Adaptive Control Algorithms: Advanced algorithms can adjust tension control settings dynamically in response to changes in speed, temperature, and material properties. This is especially beneficial in industries where materials with varying elasticity are processed.
Data Logging and Analytics: Integration with data logging systems allows for monitoring and recording tension control performance. Analytics can provide insights into system efficiency, identify patterns, and support predictive maintenance.
Remote Monitoring and Control: Many closed-loop systems now support remote monitoring and adjustments via a centralized system. Operators can track system performance, adjust parameters, and troubleshoot issues without needing to be physically present.
Integration with Industry 4.0: Closed-loop systems that are Industry 4.0-compatible can be connected to a larger network, allowing for predictive maintenance, real-time monitoring across multiple production lines, and integration with other smart systems.
Choosing the Right Closed-Loop Tension Control System
When selecting a closed-loop tension control system, it is essential to consider:
Material Properties: Different materials have unique characteristics, such as elasticity and thickness, requiring different tension control approaches.
Process Speed and Variability: High-speed processes require fast-responding control systems with robust sensors and actuators to avoid lag in tension adjustments.
Environmental Factors: Temperature, humidity, and other environmental conditions can affect tension. Systems designed to compensate for these variables can provide more consistent results.
Integration Needs: Ensuring that the tension control system is compatible with existing production lines and can integrate with broader automation systems is critical for seamless operation.
Support and Maintenance: A reliable system provider with a good support network is essential for training, maintenance, and troubleshooting.
In summary, a closed-loop tension control system is a vital asset in any industry that relies on precise material handling. By continuously monitoring and adjusting tension in real-time, these systems provide unmatched control, ensuring quality, efficiency, and reduced waste. With advances in adaptive algorithms, automated calibration, and remote monitoring, closed-loop tension control systems are becoming increasingly sophisticated, meeting the growing demands of modern industrial processes. Whether in printing, packaging, textiles, or electronics, these systems are critical to achieving high standards of precision and reliability in production.
X-ray fluorescence (XRF) technology has become an essential analytical tool across numerous industries due to its versatility, accuracy, and ability to provide rapid, non-destructive elemental analysis. From mining and geology to environmental science and manufacturing, XRF has applications that drive critical insights, improve product quality, and support regulatory compliance. In this article, we explore the various applications of XRF and how it serves as an indispensable tool in modern industry.
1. Mining and Geology
XRF technology is widely used in the mining and geological sectors for on-site elemental analysis. Its ability to quickly identify the composition of minerals and ores makes it invaluable for:
Exploration and Prospecting: Portable XRF analyzers help geologists identify potential mineral deposits and assess ore quality. This rapid identification saves time and resources, allowing for quick decision-making in the field.
Ore Grade Control: XRF assists in evaluating ore composition to ensure quality and consistency, helping optimize extraction and processing.
Geochemical Mapping: By analyzing rock samples, XRF enables the mapping of geological formations, leading to a better understanding of mineral distribution and geological history.
2. Environmental Science and Conservation
Environmental scientists and regulatory bodies rely on XRF to monitor and assess soil, water, and air quality, as well as detect contamination and pollutants.
Soil Analysis: XRF identifies and quantifies heavy metals like lead, arsenic, and cadmium in soil, which is essential in assessing land pollution and determining remediation needs.
Airborne Particulate Analysis: Filters used in air monitoring systems can be analyzed with XRF to detect metals in airborne particles, helping assess air quality and pollution sources.
Water Quality Testing: Although primarily used for solid samples, XRF can analyze precipitates and sediments in water, providing insights into metal contamination levels in aquatic environments.
3. Metallurgy and Metal Manufacturing
In the metal industry, XRF is a powerful tool for quality control, materials sorting, and compliance with alloy standards.
Quality Assurance: XRF analyzes metal composition in real-time, ensuring that alloys meet precise specifications required for manufacturing applications.
Scrap Sorting and Recycling: Scrap metal yards and recycling facilities use XRF to sort and classify metals, making the recycling process more efficient and environmentally friendly.
Process Control: Manufacturers use XRF in process control applications to ensure material uniformity and quality throughout the production stages, reducing waste and rework.
4. Archaeology and Art Conservation
XRF plays a crucial role in archaeology, art conservation, and museum sciences by providing insights into the elemental composition of artifacts and artworks without damaging them.
Artifact Analysis: XRF allows archaeologists to identify materials, coatings, and pigments used in ancient artifacts, revealing information about historical and cultural practices.
Art Authentication: Conservators and art historians use XRF to examine paintings and sculptures, determining the age of materials and detecting forgeries.
Preservation Efforts: XRF helps in assessing deterioration in artifacts and artworks, enabling targeted restoration efforts with minimal risk to the original material.
5. Pharmaceutical and Food Safety
The pharmaceutical and food industries use XRF to ensure safety and quality, adhering to strict regulatory standards.
Pharmaceutical Analysis: XRF identifies and quantifies trace elements in drugs, ensuring purity and compliance with health standards.
Food Safety: XRF can detect contaminants and heavy metals in food products, ensuring compliance with food safety regulations and protecting public health.
Packaging Compliance: XRF also examines packaging materials for toxic elements like lead or cadmium, ensuring they are safe for contact with food and pharmaceuticals.
6. Electronics and Consumer Goods
X-Ray fluorescence spectrometer is extensively used in the electronics and consumer goods industries for component testing, safety compliance, and quality control.
RoHS Compliance: The Restriction of Hazardous Substances (RoHS) directive restricts the use of certain hazardous materials in electronics. XRF is used to test components and ensure compliance with these regulations.
Quality Control in Manufacturing: XRF helps manufacturers ensure the consistency and quality of electronic components, such as solder, batteries, and connectors, by verifying material composition.
Consumer Goods Testing: XRF is used to test products like toys, jewelry, and cosmetics for harmful metals, ensuring they meet safety standards.
7. Automotive and Aerospace Industries
The automotive and aerospace industries utilize XRF for material testing, quality control, and regulatory compliance, especially for critical components where material integrity is essential.
Alloy Verification: XRF is used to confirm that parts are made from the correct alloys, critical in applications where material properties directly impact safety.
Coating Thickness Measurement: XRF measures the thickness of coatings on parts, ensuring they meet specifications for corrosion resistance and durability.
Failure Analysis: XRF can help identify contaminants or structural issues in parts that may have contributed to failure, supporting improvements in design and manufacturing.
To sum up, the versatility and efficiency of XRF make it a valuable analytical tool across a wide range of industries. With advancements in portable XRF technology, users can now perform rapid, on-site elemental analysis, reducing costs and time associated with traditional laboratory methods. The non-destructive nature, ease of use, and broad applicability of XRF continue to drive its adoption in new fields, enabling better decision-making, safety, and quality control across diverse applications. As industries continue to innovate and adopt stricter regulations, XRF technology is poised to play an even greater role in ensuring compliance, improving processes, and enhancing our understanding of materials.
Marine searchlights and marine spotlights are essential tools in maritime navigation and safety, each serving unique functions. Although they are sometimes used interchangeably, their differences in design, functionality, and application mean they are suited for different maritime tasks. This article explores the key differences between marine searchlights and spotlights, their uses, and which situations benefit most from each type.
1. Primary Purpose and Function
Marine searchlights are primarily designed for long-range illumination are primarily designed for long-range illumination. They emit a powerful, narrow beam that can reach significant distances, allowing users to locate distant objects, hazards, or vessels. Their intense brightness and focus make them ideal for search-and-rescue operations and nighttime navigation in low-visibility conditions.
Marine spotlights, on the other hand, provide more localized, wider-angle illumination. They are often used for tasks within closer proximity to the vessel, such as docking, deck lighting, and illuminating specific areas on the boat. While they can provide concentrated light, they generally do not have the same reach or intensity as searchlights.
2. Beam Intensity and Range
Searchlights produce a narrow, intense beam that can extend hundreds to thousands of meters. This high-intensity beam is critical in identifying objects or landmarks far away from the vessel. The long range and focused light beam reduce glare and allow for precise illumination of targets at extended distances.
Spotlights typically produce a wider, less intense beam designed for short to medium distances. This makes them ideal for tasks around the boat where widespread illumination is needed but without the intense focus required for long-range tasks.
3. Design and Control Features
Searchlights often come with advanced features such as remote controls, motorized swiveling capabilities, and adjustable beam angles. These features allow operators to scan large areas from a safe distance and adjust the beam as needed, even from the helm.
Spotlights are generally simpler in design and operation, often manually adjustable or mounted in fixed positions. Some spotlights offer adjustable beam angles or brightness controls, but they typically lack the sophisticated remote-control features found in searchlights.
4. Energy Consumption and Efficiency
Searchlights require more power due to their intense output, which can be a consideration on vessels where energy efficiency is critical. The high wattage and focus of these lights make them efficient in terms of reaching long distances, but they consume more power than spotlights.
Spotlights are generally more energy-efficient, consuming less power due to their lower intensity and wider beams. This makes them more suitable for tasks where prolonged use is necessary without draining a vessel’s power supply.
5. Applications and Ideal Uses
Marine Searchlights are ideal for:
Search-and-rescue operations where long-range visibility is crucial.
Navigation through challenging or poorly lit waters.
Situations requiring the identification of objects or hazards at great distances.
Marine Spotlights are better suited for:
Docking maneuvers where precise lighting in a close area is necessary.
Deck illumination for crew activities or maintenance tasks.
Short-range tasks where broader light coverage is more beneficial than distance.
6. Cost and Maintenance Considerations
Searchlights tend to be more expensive due to their advanced features and powerful capabilities. They may also require more maintenance, as their high-intensity bulbs and motorized parts can wear out faster with frequent use.
Spotlights are generally more affordable and easier to maintain, with fewer moving parts and simpler designs. They often use LED or halogen bulbs that are durable and energy-efficient, reducing maintenance needs over time.
Comparison Between Marine Searchlights and Marine Spotlights
Marine searchlights and marine spotlights are essential tools in maritime navigation and safety, each serving unique functions. Although they are sometimes used interchangeably, their differences in design, functionality, and application mean they are suited for different maritime tasks. This article explores the key differences between marine searchlights and spotlights, their uses, and which situations benefit most from each type.
1. Primary Purpose and Function
Marine Searchlights are primarily designed for long-range illumination. They emit a powerful, narrow beam that can reach significant distances, allowing users to locate distant objects, hazards, or vessels. Their intense brightness and focus make them ideal for search-and-rescue operations and nighttime navigation in low-visibility conditions.
Marine spotlights, on the other hand, provide more localized, wider-angle illumination. They are often used for tasks within closer proximity to the vessel, such as docking, deck lighting, and illuminating specific areas on the boat. While they can provide concentrated light, they generally do not have the same reach or intensity as searchlights.
2. Beam Intensity and Range
Searchlights produce a narrow, intense beam that can extend hundreds to thousands of meters. This high-intensity beam is critical in identifying objects or landmarks far away from the vessel. The long range and focused light beam reduce glare and allow for precise illumination of targets at extended distances.
Spotlights typically produce a wider, less intense beam designed for short to medium distances. This makes them ideal for tasks around the boat where widespread illumination is needed but without the intense focus required for long-range tasks.
3. Design and Control Features
Searchlights often come with advanced features such as remote controls, motorized swiveling capabilities, and adjustable beam angles. These features allow operators to scan large areas from a safe distance and adjust the beam as needed, even from the helm.
Spotlights are generally simpler in design and operation, often manually adjustable or mounted in fixed positions. Some spotlights offer adjustable beam angles or brightness controls, but they typically lack the sophisticated remote-control features found in searchlights.
4. Energy Consumption and Efficiency
Searchlights require more power due to their intense output, which can be a consideration on vessels where energy efficiency is critical. The high wattage and focus of these lights make them efficient in terms of reaching long distances, but they consume more power than spotlights.
Spotlights are generally more energy-efficient, consuming less power due to their lower intensity and wider beams. This makes them more suitable for tasks where prolonged use is necessary without draining a vessel’s power supply.
5. Applications and Ideal Uses
Marine Searchlights are ideal for:
Search-and-rescue operations where long-range visibility is crucial.
Navigation through challenging or poorly lit waters.
Situations requiring the identification of objects or hazards at great distances.
Marine Spotlights are better suited for:
Docking maneuvers where precise lighting in a close area is necessary.
Deck illumination for crew activities or maintenance tasks.
Short-range tasks where broader light coverage is more beneficial than distance.
6. Cost and Maintenance Considerations
Searchlights tend to be more expensive due to their advanced features and powerful capabilities. They may also require more maintenance, as their high-intensity bulbs and motorized parts can wear out faster with frequent use.
Spotlights are generally more affordable and easier to maintain, with fewer moving parts and simpler designs. They often use LED or halogen bulbs that are durable and energy-efficient, reducing maintenance needs over time.
Choosing the Right Light for Your Vessel
When selecting between a marine searchlight and spotlight, it is important to consider the vessel’s primary usage, power capacity, and the nature of operations conducted at sea:
Searchlights are better for vessels engaged in open water navigation, long-distance visibility needs, or emergency operations.
Spotlights are practical for general lighting around the vessel and are essential for everyday tasks that require moderate lighting intensity within close range.
Both marine searchlights and spotlights play essential roles in maritime operations, enhancing safety and visibility in various conditions. Choosing the right one ultimately depends on the vessel’s specific requirements, operating environment, and desired features.
Rivets are small, cylindrical mechanical fasteners with a head on one end and a tail on the other. When installed, they permanently join materials by forming a new head on the tail end, effectively “locking” the rivet in place. Rivets are among the oldest forms of fastening, dating back to ancient times, but they remain widely used today due to their reliability, strength, and ease of installation in various applications. This article explores the basics of rivets, their types, benefits, and applications across different industries.
How Rivets Work
Rivets work by forming a permanent bond between two or more materials, such as metal, plastic, or wood. The process involves inserting a rivet into pre-drilled holes in the materials to be joined. Once the rivet is in place, a tool (such as a rivet gun or hammer) is used to deform or “buck” the tail end, creating a new head and securing the rivet in place. This deformation locks the rivet tightly, ensuring it holds materials together even under stress.
Rivets come in various types, each suited to specific applications and environments. Some of the most common types include:
Solid Rivets: The simplest type, solid rivets are made from a single piece of metal and require access to both sides of the workpiece for installation. They are highly durable and are commonly used in structural applications like bridges, buildings, and aircraft.
Pop Rivets: Designed for applications where only one side of the workpiece is accessible, pop rivets are installed using a special tool that pulls a mandrel through the rivet, expanding and securing it. Blind rivets are widely used in manufacturing, automotive, and construction industries.
Tubular Rivets: These rivets have a partial hole in the tail end, making them easier to deform during installation. They are typically used in applications where a secure yet lightweight fastener is needed, such as in electronics, clothing, and light-duty assemblies.
Split Rivets: Split rivets feature a tail end that splits into two, spreading outwards when installed. This design provides additional grip and holding power, making them ideal for joining soft or brittle materials, such as leather, plastic, and certain textiles.
Drive Rivets: These rivets have a small mandrel that is driven into the rivet with a hammer, causing it to expand and grip the material. They are often used for quick, low-load applications where speed and simplicity are important.
Flush Rivets (Countersunk Rivets): Flush rivets are designed to sit flush with the surface of the material, minimizing drag and creating a smooth surface. They are commonly used in aerospace applications to improve aerodynamics.
Benefits of Using Rivets
Rivets offer several advantages as fasteners, including:
Strength and Durability: Rivets are strong and resistant to shear forces, making them suitable for applications where materials need to stay firmly joined under load or vibration.
Cost-Effectiveness: Rivets are generally inexpensive and offer an economical solution for permanent fastening, especially in mass production.
Corrosion Resistance: Many rivets are made from materials like aluminum, stainless steel, and copper, which resist rust and corrosion, making them ideal for outdoor or marine environments.
Versatility: With various types available, rivets can be used on a wide range of materials and applications, from heavy structural work to delicate fabric or electronic assemblies.
Quick Installation: Rivets are typically faster to install than other fasteners, such as bolts, which often require threading and tightening.
Applications of Rivets
Rivets are used across many industries due to their adaptability and strength. Some common applications include:
Construction: In buildings, bridges, and other structures, rivets are commonly used to join steel beams and structural components, offering long-lasting strength and resilience.
Aerospace: Rivets, particularly flush rivets, are critical in aerospace for constructing aircraft bodies. Their durability and smooth finish help improve aerodynamics and withstand high-altitude conditions.
Automotive: In the automotive industry, rivets are used in bodywork, interior assemblies, and even engine components where durability and a lightweight connection are needed.
Manufacturing: Blind rivets are widely used in manufacturing for quickly assembling metal sheets, plastic panels, and other components. Their speed of installation is an asset in high-volume production.
Electronics: Lightweight rivets like tubular rivets are used in electronics for joining components without adding bulk, allowing for compact device designs.
Textiles and Leather Goods: Split rivets are popular in the fashion industry, where they’re used to attach labels, decorative elements, and structural components in bags, belts, and shoes.
Choosing the Right Rivet for the Job
When selecting rivets, consider the following factors:
Material Compatibility: Rivet material should match or be compatible with the materials being joined to prevent corrosion or galvanic reactions.
Strength Requirements: Solid rivets provide maximum strength, while tubular or blind rivets are suitable for lighter applications where speed and accessibility are priorities.
Accessibility: For applications with access to only one side, blind rivets are ideal, whereas solid rivets require access to both sides of the material.
Environmental Conditions: In corrosive or high-temperature environments, materials like stainless steel or aluminum are recommended to ensure long-lasting durability.
In summary, Rivets are an essential fastener that provides strong, durable, and permanent connections across a wide range of industries. With various types available for different applications, they offer versatility and reliability. Whether in structural construction, automotive manufacturing, or aerospace, rivets play a critical role in creating robust, long-lasting assemblies. By selecting the right type of rivet and considering material compatibility, strength needs, and environmental conditions, manufacturers and builders can ensure the success and longevity of their projects.
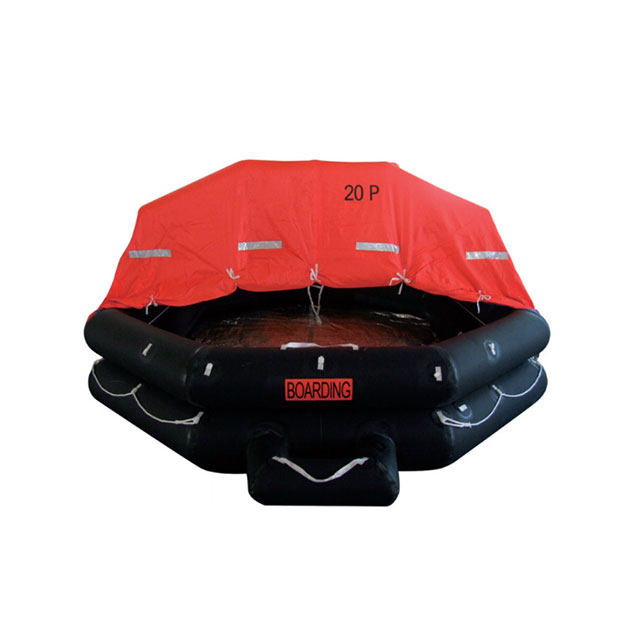
Inflatable life rafts are crucial emergency devices designed to save lives during maritime emergencies. Their reliability is vital as they must deploy quickly, withstand harsh conditions, and provide essential protection for stranded passengers and crew until rescue. Over the years, advancements in materials, design, and maintenance practices have greatly improved the reliability of inflatable life rafts. This article explores the key areas of improvement, from modern materials to best maintenance practices, that enhance the performance and reliability of inflatable life rafts.
1. Advanced Materials and Durability
Modern inflatable life rafts are made from materials engineered for durability, flexibility, and resistance to extreme marine environments. Key material advancements include:
Hypalon and Neoprene Coatings: Many life rafts are now made with Hypalon or neoprene-coated fabrics, which are highly resistant to abrasion, UV exposure, and saltwater. This makes them durable enough to withstand prolonged exposure to sunlight, rough seas, and other challenging conditions without deteriorating.
Thermoplastic Polyurethane (TPU): TPU is a newer material used for high-performance life rafts. It offers excellent elasticity, puncture resistance, and resistance to cold temperatures, making it suitable for use in various climates and marine conditions.
Reinforced Seam Technologies: To prevent seam failure—a common vulnerability in inflatable products—manufacturers have introduced reinforced seams, double-stitching, and heat-welded seams. These improvements significantly enhance the structural integrity of the life raft and reduce the likelihood of leaks.
2. Improved Inflation Systems
Inflatable life rafts must deploy automatically and reliably when needed. Advances in inflation technology ensure faster, safer, and more reliable deployment:
Automated Inflation Mechanisms: Advanced self-inflating life rafts use automated inflation systems that activate when the raft is deployed in water, eliminating the need for manual activation. These systems utilize compressed gas cylinders, typically filled with CO₂, which are engineered to maintain optimal pressure and deploy rapidly when triggered.
Redundant Inflation Chambers: Many inflatable life rafts now feature multiple independent inflation chambers. If one chamber is punctured or fails, others remain functional, keeping the raft buoyant and safe.
Pressure Relief Valves: To prevent overinflation, which could lead to rupture, pressure relief valves are integrated into the inflation system. These valves release excess gas and maintain the raft’s structural integrity in varying temperature conditions.
3. Enhanced Stability and Resilience
Stability is essential for life rafts, especially in rough seas. Modern life raft designs incorporate stability-enhancing features such as:
Ballast Bags: Ballast bags, or water pockets, are added to the bottom of life rafts to increase stability. These bags fill with seawater and help the raft resist capsizing by keeping its center of gravity low.
Canopy and Spray Shields: To protect occupants from waves, wind, and sunlight, life rafts are equipped with canopies and spray shields. Many newer models also feature built-in reflective materials to increase visibility for rescuers.
Insulation and Thermal Protection: In cold environments, hypothermia is a significant risk. Modern life rafts may include insulated floors and thermal protective covers, helping occupants maintain body temperature while awaiting rescue.
4. Improved Accessibility and Comfort Features
Making life rafts more accessible and comfortable is critical, especially when they are occupied for extended periods. Recent advancements include:
Ergonomic Design and Seating: Many life rafts are designed with ergonomic seating arrangements, which make them more comfortable and reduce fatigue among occupants.
Emergency Kits and Ration Storage: Inflatable life rafts come equipped with emergency kits containing essential survival supplies, such as water, food rations, first aid, signaling devices, and repair patches. In some cases, additional compartments are designed to protect these supplies from water and salt.
Efficient Ventilation and Moisture Control: Life rafts now often include ventilation ports to reduce condensation and improve air circulation, ensuring a healthier environment inside the raft.
5. Regular Maintenance and Inspection for Reliability
Routine inspection and maintenance are crucial for ensuring the reliability of inflatable life rafts. Following best practices for care and inspection minimizes the risk of malfunction:
Inspection and Servicing: Life rafts must be regularly inspected and serviced to ensure that the inflation system, seams, valves, and emergency kits are in good working order. These checks should follow manufacturer recommendations and international maritime safety standards.
Proper Storage and Environmental Control: When not in use, life rafts should be stored in a dry, temperature-controlled environment to prevent material degradation. Storing them in sealed containers helps protect them from sunlight, humidity, and contaminants.
Training and Familiarization: Crew members should be trained on proper deployment, handling, and maintenance procedures for life rafts. Familiarization with emergency procedures improves confidence and ensures that life rafts are deployed and used correctly in real emergencies.
6. Adherence to International Safety Standards
Ensuring that life rafts meet regulatory standards is essential for their reliability. Standards and certifications provide benchmarks for quality and performance, such as:
International Maritime Organization (IMO) Standards: The IMO sets safety and operational standards for life rafts through the Safety of Life at Sea (SOLAS) convention. Compliance with these standards ensures that life rafts are designed and tested to perform under various conditions.
ISO Certifications: ISO certifications, such as ISO 9650 for life-saving appliances, cover quality requirements for the materials, performance, and testing of inflatable life rafts. Manufacturers that follow these guidelines demonstrate a commitment to producing high-quality, reliable life rafts.
Overall, the reliability of inflatable life rafts has improved significantly due to advancements in materials, design, and automated inflation systems. Modern life rafts are built to withstand extreme conditions and offer stability, durability, and essential survival features to protect occupants in emergency situations. Regular inspection and adherence to safety standards are also key to ensuring that these life-saving devices remain dependable. With continued innovations and best practices in maintenance, inflatable life rafts will remain a critical tool for maritime safety, providing peace of mind to seafarers and passengers alike.
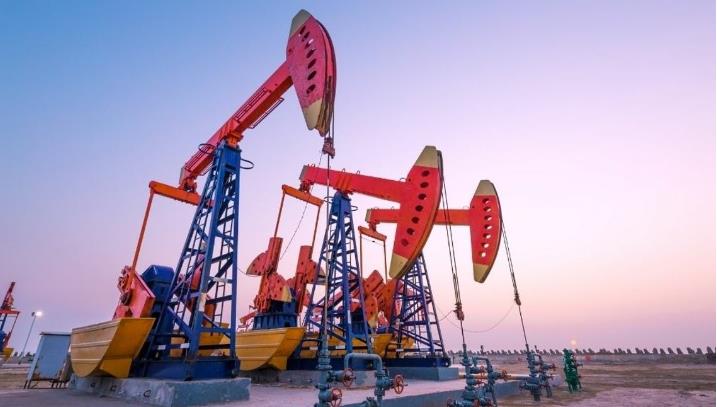
Drilling engineering is a specialized field within petroleum engineering that focuses on the planning, design, execution, and management of drilling operations. The primary goal of drilling engineering is to drill wells safely, efficiently, and cost-effectively to access hydrocarbons. This discipline is essential in oil and gas exploration, where it plays a critical role in optimizing the extraction of resources while minimizing environmental impact and ensuring operational safety.
Core Functions of Drilling Engineering
Drilling engineering covers several core functions that ensure the successful completion of a well. These include:
Well Planning and Design: This is the foundational step in which engineers decide on the well’s location, trajectory, and depth. During planning, engineers use geological and geophysical data to optimize well placement and maximize reservoir contact. They also consider factors like well integrity, cost constraints, and potential environmental hazards.
Drilling Fluid Management: Drilling fluids, also known as “drilling mud,” are essential for maintaining well stability, cooling the drill bit, carrying cuttings to the surface, and balancing formation pressures. Engineers design these fluids based on the specific conditions of each well to ensure efficiency and safety.
Drilling Equipment Selection: Engineers select specialized equipment, such as drill bits, drill pipes, and bottom-hole assemblies, based on the formation’s characteristics. Each piece of equipment must be compatible with the geological and operational conditions, as well as the desired trajectory of the well.
Pressure Control and Well Integrity: Pressure control is crucial in drilling operations to prevent incidents like blowouts. Engineers use blowout preventers (BOPs) and maintain well integrity through proper casing and cementing to prevent uncontrolled flow of fluids into the wellbore.
Rotary Drilling: The most commonly used method, rotary drilling employs a rotating drill bit to cut through rock formations. The rotation is achieved through a rotary table on the rig floor or a top drive, and drilling mud is circulated to cool the bit and carry rock cuttings to the surface.
Directional Drilling: This technique allows engineers to drill at angles rather than just vertically. Directional drilling is essential for accessing reservoirs that are not directly below the drilling site and is commonly used in offshore drilling.
Horizontal Drilling: Horizontal drilling is a form of directional drilling where the wellbore is turned horizontal to increase the surface area in contact with the reservoir. This method is highly effective in unconventional reservoirs, such as shale plays, where it enables greater access to hydrocarbon-rich zones.
Managed Pressure Drilling (MPD): MPD is a specialized technique that allows for better control over downhole pressures, reducing the risk of formation damage and blowouts. This method is especially useful in complex geological conditions.
Drilling Challenges and Solutions
Drilling operations come with a variety of challenges that require innovative solutions:
High-Temperature and High-Pressure (HTHP) Environments: Drilling in extreme environments requires advanced materials and equipment to withstand high temperatures and pressures without failure. HTHP wells often require specialized drilling fluids, advanced sensors, and enhanced drilling tools.
Unconventional Reservoirs: Extracting oil and gas from unconventional reservoirs, such as shale formations, requires complex drilling techniques like hydraulic fracturing combined with horizontal drilling. Engineers must manage wellbore stability, proppant placement, and pressure to ensure successful extraction.
Deepwater Drilling: In offshore drilling, deepwater and ultra-deepwater wells present logistical and technical challenges. Engineers use remotely operated vehicles (ROVs) and advanced monitoring systems to handle these operations, often deploying specialized rigs designed for deepwater conditions.
Environmental and Safety Concerns: Reducing the environmental impact and ensuring the safety of workers is a top priority. Drilling engineers are developing eco-friendly drilling fluids, implementing best practices in well control, and adhering to strict regulatory standards to mitigate environmental risks.
Innovations and Future Trends in Drilling Engineering
The future of drilling engineering is shaped by technological advancements that improve efficiency, safety, and environmental sustainability. Key trends include:
Automation and Digitalization: Automation is revolutionizing drilling operations by enabling real-time data collection, remote monitoring, and predictive maintenance. Digital twins—virtual models of the drilling process—allow engineers to simulate various scenarios and optimize drilling performance.
Enhanced Drilling Sensors: Modern wells use an array of sensors that monitor temperature, pressure, and vibration levels in real-time. Advanced measurement-while-drilling (MWD) and logging-while-drilling (LWD) technologies provide continuous data on subsurface conditions, allowing for better decision-making.
Top Drive Drilling Systems: These systems provide a safer and more efficient alternative to traditional rotary tables by directly rotating the drill string from the top. Top drive systems are particularly beneficial in complex wells, where they allow for easier control over drilling speed and torque.
Sustainable Drilling Practices: With the global push for sustainability, drilling engineering is focusing on minimizing emissions, reducing the use of non-recyclable materials, and implementing energy-efficient practices. For example, advanced water-based muds are being developed as eco-friendly alternatives to oil-based muds.
Advanced Geosteering Technologies: Geosteering is the process of adjusting the well trajectory in real-time based on geological data. Advanced geosteering technologies use seismic and LWD data to steer the drill bit more precisely, maximizing reservoir exposure.
Drilling Software: Drilling Software refers to specialized tools that streamline planning, monitoring, and optimizing drilling operations in industries like oil and gas. It enables engineers to design well trajectories, monitor real-time data, and simulate drilling parameters such as pressure and rate of penetration. With capabilities like geosteering, automated risk assessment, and performance analysis, drilling software enhances safety, reduces operational costs, and supports efficient, data-driven decision-making. Integrating advanced technologies such as AI and machine learning, drilling software is pivotal for achieving precision, safety, and sustainability in modern drilling projects.
Career and Industry Outlook
Drilling engineers are in demand globally, especially in regions with rich hydrocarbon reserves. As the industry evolves to meet environmental regulations and the demand for energy efficiency, there is a growing need for engineers skilled in emerging technologies like automation, data analysis, and sustainability-focused drilling methods. In addition to traditional oil and gas applications, drilling engineering skills are also valuable in geothermal energy extraction, water well drilling, and carbon capture and storage (CCS) projects.
In summary, drilling engineering is an essential field that combines engineering principles, geological knowledge, and technological innovation. From traditional drilling to advanced techniques, drilling engineers are instrumental in safely and efficiently tapping into the Earth’s energy resources. As the industry continues to evolve, innovations in automation, digitalization, and sustainability will redefine the future of drilling engineering, making it a dynamic and impactful career path for engineers passionate about the energy sector.
Retrofitting web guiding systems offers an effective way to enhance machine performance, precision, and reliability without the need for a full replacement of equipment. Web guiding systems are essential for industries relying on precise material alignment, such as printing, packaging, textiles, and converting. This article explores the benefits, types of retrofitting, and specific solutions to consider when updating these systems.
Benefits of Retrofitting Web Guiding Systems
Upgrading existing web guiding system equipment through retrofitting can provide numerous advantages, including:
Improved Accuracy: Modern sensor technology can significantly enhance tracking accuracy.
Cost-Effectiveness: Retrofitting is often more affordable than purchasing a new system, enabling companies to maximize their ROI.
Reduced Downtime: By upgrading components rather than replacing an entire system, retrofitting can reduce the time needed to get the system operational.
Enhanced System Integration: Modern controllers and digital components allow for better integration with other equipment, leading to a more unified workflow.
Extended Equipment Life: Retrofitting increases the lifespan of older equipment by replacing worn-out or outdated parts.
Types of Retrofit Solutions for Web Guiding Systems
Retrofit solutions vary based on the type of system in use and the specific requirements of the application. Here are some commonly implemented retrofit options:
Sensor Upgrades: Replacing older, less efficient sensors with modern, high-resolution options (e.g., ultrasonic or infrared) allows for better alignment, especially with transparent or reflective materials.
Controller Upgrades: Digital web guide controllers enable better calibration, more accurate positioning, and easier interfacing with other equipment in the production line.
Actuator Replacement: Hydraulic or pneumatic actuators can be replaced with advanced servo-driven actuators, which offer greater precision and are easier to maintain.
Software Integration: Adding or upgrading software modules can allow real-time monitoring and control, with options to log data, track web alignment, and implement predictive maintenance.
Operator Interface Improvements: Newer touch-screen panels and user-friendly interfaces can enhance operator control, making adjustments and troubleshooting simpler.
Steps for Implementing Retrofit Solutions
To ensure a successful retrofit, consider the following steps:
Assessment of Current System: Conduct a thorough analysis to understand the limitations and inefficiencies of the existing system. Determine which components can be reused and which need replacement.
Compatibility Check: Ensure that new parts and software are compatible with existing machinery to prevent integration issues.
Select Retrofitting Components: Choose reliable, durable parts that align with the production requirements and budget constraints.
Installation and Calibration: Install and calibrate new components, ensuring they work seamlessly with the older system. Testing is essential to verify alignment accuracy and system response.
Training for Operators: Provide training on new features to maximize the benefits of the retrofit. This helps operators understand the updated interface, troubleshoot, and maintain optimal performance.
Key Retrofit Components and Technologies
Advanced Edge Sensors: Ultrasonic, infrared, and CCD sensors offer high precision and are ideal for various materials. They improve detection accuracy and adjust to changes in material thickness or transparency.
Servo-Motor Actuators: These actuators provide responsive control, ensuring smoother and faster alignment, which is crucial for high-speed applications.
Programmable Logic Controllers (PLCs): PLCs are widely used in retrofits due to their versatility, reliability, and ability to handle complex control functions, including real-time monitoring.
Digital Operator Panels: Modern panels with intuitive touch interfaces allow for easy parameter setting, making adjustments quick and minimizing downtime.
Integrated Monitoring Software: Adding web monitoring software facilitates real-time tracking, enabling early detection of alignment issues and reducing material waste.
Considerations for Choosing Retrofit Solutions
When selecting components and solutions for retrofitting web guiding systems, consider:
Production Speed and Volume: High-speed applications benefit from advanced actuators and high-precision sensors.
Material Type: Transparent, opaque, or reflective materials may require specific types of sensors for optimal detection accuracy.
Budget Constraints: Calculate the ROI for each component and prioritize upgrades that offer the most significant impact.
Future Expansion: Choose components that can adapt to future production needs, allowing for scalability and additional upgrades if necessary.
Ovarall, retrofitting web guiding systems is an effective way to enhance operational efficiency, reduce waste, and extend the lifespan of existing equipment. With improvements in sensor technology, actuator precision, and software integration, retrofitting offers a practical and cost-effective alternative to full system replacement. By carefully assessing current needs and selecting appropriate retrofit components, companies can achieve better alignment, increased productivity, and greater adaptability in their production processes.
In today’s competitive market, brands are constantly seeking unique ways to connect with their audiences and stand out. One increasingly popular approach is through custom plush toys, which offer a unique blend of charm, tangibility, and nostalgia. Custom plushies are not just cute products; they’re memorable brand ambassadors that strengthen emotional connections, enhance brand loyalty, and offer a fun, collectible item. From brand mascots to custom designs that reflect a company’s values, custom plush toys are proving to be a powerful tool for both branding and marketing.
1. Why Custom Plush?
Custom plush toys offer a level of personalization and warmth that few promotional items can match. Unlike typical branded merchandise, a plush toy appeals to all ages and provides brands with a medium that feels personal, playful, and genuine. For companies looking to humanize their brand, connect on a deeper level, and be a part of their customers’ daily lives, custom plush is a highly effective option.
2. Branding Benefits of Custom Plush
Enhanced Emotional Connection: Plush toys evoke nostalgia, comfort, and joy, creating a positive emotional link to the brand. Consumers are more likely to remember and engage with a brand that offers such meaningful interactions.
Boosted Brand Loyalty: Providing customers with a custom plush toy can foster brand loyalty, as they view the brand more fondly. Plush toys often become cherished keepsakes, reinforcing the brand’s presence in the customer’s life over time.
Wider Audience Appeal: Plush toys transcend age and demographics. Children, teenagers, and adults alike find value in plush toys, making them ideal for broad appeal, whether in retail, giveaways, or as part of a promotional campaign.
Memorable Merchandise: A plush toy with a unique brand design is far more likely
3. Types of Custom Plush for Branding
Brands can choose from a variety of custom plush options to align with their brand message and goals:
Mascot Plush Toys: If a brand has a mascot, creating it as a plush toy is a natural way to extend its personality and presence. Mascots connect emotionally with consumers, and having a plush version can amplify this connection.
Product-Inspired Plushies: Some brands create plush toys that resemble their iconic products. For instance, a coffee brand might make a plush in the shape of a coffee cup, or a snack company might create plush versions of their most popular treats.
Seasonal or Limited Editions: Custom plush toys released seasonally or as limited editions create excitement and exclusivity, encouraging consumers to act quickly. Limited-edition plushies are also popular as collectibles, especially when brands introduce new designs over time.
Collaborative Plush Designs: Brands can also collaborate with influencers, celebrities, or other brands to create plush toys that leverage mutual fan bases and increase visibility. These partnerships add an extra layer of value and uniqueness to the plush toy.
4. How Brands Use Custom Plush in Marketing
Custom plush toys can serve multiple functions in a brand’s marketing strategy. Here’s how companies are leveraging them effectively:
Retail and Online Merchandise: Many brands add custom plush toys to their product lines, either as standalone items or as part of gift packages, appealing directly to consumers who enjoy collecting or gifting unique items.
Promotional Giveaways: Custom plushies make exceptional giveaways, whether at trade shows, events, or through online campaigns. People are more likely to engage with a brand’s promotion when they receive a high-quality, memorable item.
Corporate Gifting: Brands use custom plush toys as corporate gifts for employees and clients, providing a fun, friendly reminder of their relationship with the brand.
Cause Marketing and Charity Initiatives: Plush toys can be tied to cause-related campaigns. For instance, a percentage of the sales from a branded plush toy can be donated to a relevant charity, allowing the brand to support causes they care about while boosting their visibility.
Creating a custom plush toy involves more than just translating a design into a physical product. Here are key aspects that brands should consider:
Material Quality: The quality of fabric, stitching, and filling affects both the durability and perception of the plush. High-quality materials and soft textures are essential to ensure that the plush is appealing and long-lasting.
Size and Scale: Plush toys come in various sizes, and brands need to choose a scale that fits the purpose of the plush, be it for desktop display, collectible purposes, or as a cuddly companion.
Brand Identity Reflection: Whether through colors, logo placement, or distinct features, the plush toy should align with the brand’s image and message. Unique elements, such as accessories or packaging, can also add to its appeal.
Safety Standards: Particularly when aimed at children, custom plush toys must meet safety regulations and standards, including non-toxic materials and secure stitching, to prevent small parts from detaching.
Eco-friendly Materials: For brands with sustainability goals, using eco-friendly, recycled, or biodegradable materials can reinforce a commitment to environmental responsibility and appeal to eco-conscious customers.
6. Success Stories: Brands Winning with Custom Plush
Several brands have successfully incorporated custom plush toys into their marketing and product offerings, building loyal followings and increased brand visibility:
Fast-Food Chains: Many fast-food chains have used custom plushies as part of limited-time promotions. These collectibles often attract large audiences, encouraging more frequent visits and increasing brand awareness.
Entertainment Brands: Animation studios, game developers, and other media companies often use custom plush versions of their characters. Fans love these items as they provide a tangible connection to beloved shows, games, or movies.
Nonprofits and Charities: Nonprofit organizations have effectively used custom plush toys in fundraising efforts, creating plush versions of animals or symbols that represent their mission. This strategy helps spread awareness and gives supporters a unique memento.
Custom plush toys are much more than a fun marketing tool; they represent a valuable investment in brand visibility, emotional connection, and customer loyalty. Whether a brand chooses to produce mascot plushies, product-inspired designs, or limited-edition collectibles, these plush toys can serve as an unforgettable brand touchpoint. With their broad appeal, longevity, and potential for storytelling, custom plush toys provide brands with a memorable, effective way to engage audiences, making them a highly versatile and powerful marketing asset.
Explosion-proof lighting is essential in marine environments where hazardous conditions, such as flammable gases and vapors, require safety measures to prevent accidental ignition. Traditionally, marine explosion-proof lights relied on incandescent or fluorescent technologies, but LED (Light Emitting Diode) lighting is now increasingly favored. This shift is driven by LED lighting’s efficiency, longevity, and performance advantages over traditional options. Here’s an an in-depth comparison of LED vs. traditional explosion-proof lighting for marine applications, analyzing factors such as energy efficiency, durability, light quality, and maintenance needs.
1. Energy Efficiency
LED Lights: LEDs are highly energy-efficient, converting up to 90% of their energy into light. This efficiency reduces power consumption, an important factor for vessels operating on limited power sources. LED explosion-proof lights, therefore, offer a sustainable choice by lowering fuel use, carbon emissions, and overall operational costs.
Traditional Lights: Traditional marine explosion-proof lights, including incandescent and fluorescent options, are less efficient, with a large portion of energy lost as heat. Incandescent lights, in particular, use significant power for minimal light output, making them an inefficient choice for energy-conscious marine operations.
Conclusion: LEDs have a significant edge in energy efficiency, contributing to cost savings and reduced environmental impact over time.
2. Durability and Lifespan
LED Lights: LEDs boast an impressive lifespan, often exceeding 50,000 hours of operation. They are also resilient to vibration and impact, making them ideal for marine environments that involve continuous movement, harsh weather, and heavy machinery.
Traditional Lights: Incandescent and fluorescent bulbs have a much shorter lifespan, typically between 1,000 and 15,000 hours, depending on the type. They are also more vulnerable to breakage under extreme conditions, leading to frequent replacements and potential downtimes in marine operations.
Conclusion: LED explosion-proof lights have a clear advantage in terms of durability and longevity, reducing the frequency of replacements and minimizing maintenance in hazardous marine settings.
3. Light Quality and Brightness
LED Lights: LEDs provide bright, clear light and offer customizable color temperatures, which enhance visibility and safety in marine operations. Additionally, LEDs reach full brightness instantly, essential for environments requiring immediate illumination without delay.
Traditional Lights: Incandescent lights provide warm but less intense illumination, while fluorescent lights can deliver bright light but often experience flickering. Both traditional options require warm-up time to reach full brightness, which can be a limitation in time-sensitive situations.
Conclusion: LEDs deliver superior light quality with options for customization, making them better suited for the high-visibility needs of marine environments.
4. Maintenance and Replacement
LED Lights: Due to their long lifespan and resilience, LEDs require minimal maintenance. They are often designed as integrated units, reducing the need for component replacements and simplifying upkeep. Additionally, the lower heat output of LEDs minimizes the risk of accidental burns during maintenance.
Traditional Lights: Traditional lights demand more frequent replacement and maintenance due to shorter lifespans and vulnerability to vibration damage. Incandescent and fluorescent bulbs can heat up considerably, increasing the risk for personnel during maintenance and raising the potential for fire hazards.
Conclusion: LED lighting significantly reduces maintenance frequency and costs, providing safer handling for maintenance personnel in hazardous marine environments.
5. Environmental Impact
LED Lights: LEDs are environmentally friendly, containing no harmful substances like mercury, and are easily recyclable. The reduced energy consumption of LEDs also contributes to lower greenhouse gas emissions, supporting eco-friendly practices in marine industries.
Traditional Lights: Fluorescent lights contain small amounts of mercury, making disposal challenging and potentially harmful to the environment. Incandescents also consume more energy, indirectly contributing to higher emissions.
Conclusion: LEDs offer an eco-friendly alternative to traditional lighting options, helping marine industries reduce their environmental impact.
6. Initial Cost vs. Long-Term Investment
LED Lights: The initial cost of LED explosion-proof lights is generally higher than traditional lighting options. However, the long lifespan, energy efficiency, and minimal maintenance required by LEDs make them a cost-effective investment over time.
Traditional Lights: Traditional lighting may offer a lower upfront cost, but higher operational costs, frequent replacements, and energy inefficiency drive up the total cost of ownership.
Conclusion: While LEDs involve a higher initial investment, their long-term savings in maintenance and energy costs make them a more economical choice for marine explosion-proof lighting.
Overall, LED explosion-proof lights are generally superior to traditional options for marine applications due to their energy efficiency, long lifespan, low maintenance needs, and environmental benefits. Although the initial cost of LEDs is higher, the return on investment quickly becomes evident through lower operational costs and reduced environmental impact. Traditional lighting may remain an option for low-cost or short-term needs, but for sustainable, safe, and efficient lighting in hazardous marine conditions, LEDs offer a compelling solution that supports modern energy and safety standards.