Web guiding systems are essential for maintaining precision in industries like printing, packaging, textiles, and converting, where continuous web materials such as paper, film, and fabric must remain accurately aligned. Among the key components in modern web guides, ultrasonic and infrared sensors stand out for their ability to ensure reliable and precise edge detection. This article delves into the functionalities, advantages, and applications of ultrasonic and infrared sensors in web guiding systems.
The Role of Sensors in Web Guides
sensors in web guides are tasked with detecting the position of the web and transmitting this information to the guide controller. This feedback enables the system to correct deviations and ensure alignment. Accurate sensing minimizes material waste, reduces downtime, and improves the quality of the final product.
Ultrasonic Sensors in Web Guides
Ultrasonic sensors operate by emitting high-frequency sound waves and measuring the reflection of these waves from the web material.
Key Features:
Material Independence: Ultrasonic web guide sensors can detect a wide range of materials, including transparent films, which may pose challenges for optical sensors.
Non-Contact Operation: They ensure accurate measurement without coming into contact with the material, preserving the web’s integrity.
High Precision: These sensors can detect even minute positional deviations, ensuring tight tolerances.
Advantages:
Suitable for various materials, including those with glossy or uneven surfaces.
Resistant to environmental factors such as dust and ambient light.
Reliable in high-speed web applications.
Applications:
Ultrasonic sensors are often used in industries dealing with transparent films, non-woven fabrics, and paper where material type varies frequently.
3. Infrared Sensors in Web Guides
Infrared sensors function by emitting and detecting infrared light. These sensors measure the intensity of reflected or transmitted infrared signals to determine the web’s position.
Compact Design: They are lightweight and easy to integrate into compact systems.
Adaptability: Infrared sensors can be fine-tuned for specific wavelengths to optimize performance with particular materials.
Advantages:
Ideal for materials with clear or colored edges.
Perform well in controlled environments with low ambient interference.
Cost-effective for specific applications requiring sharp edge detection.
Applications:
Infrared sensors are commonly used in industries where the web material exhibits consistent contrast, such as in foil-based or dyed materials.
Integration Challenges and Solutions
While both ultrasonic and infrared sensors offer significant benefits, their integration requires addressing specific challenges:
Calibration Needs: Regular calibration ensures consistent performance, especially in varying environmental conditions.
System Compatibility: Matching sensor output to the guide controller is critical for seamless operation.
Material Variations: Advanced algorithms in the controller can compensate for material inconsistencies.
Future Trends in Sensor Technology for Web Guides
The integration of AI and IoT with ultrasonic and infrared sensors is reshaping web guiding systems. Smart sensors with self-calibration capabilities and enhanced real-time feedback are becoming the norm. These advancements promise to reduce manual intervention, enhance precision, and further optimize production efficiency.
In summary, Ultrasonic and infrared sensors play pivotal roles in modern web guiding systems, each excelling in specific applications. By understanding their unique strengths and limitations, manufacturers can select the most appropriate sensor technology to optimize their web handling processes. As these sensors continue to evolve, their integration will further enhance the precision and reliability of web guides, driving innovation across industries.
The oil and gas industry is characterized by complex operations, challenging environments, and the need for rigorous safety protocols. To meet these demands, companies are increasingly leveraging simulation tools with Virtual Reality (VR) and Augmented Reality(AR) technologies for oil and gas workforce training. These immersive tools are transforming traditional training approaches, offering significant advantages in safety, cost-efficiency, and knowledge retention.
Benefits of VR and AR in Oil and Gas Training
a. Enhanced Safety
Workers in the oil and gas sector often face hazardous scenarios, including extreme weather conditions, high-pressure systems, and flammable materials. VR and AR simulations allow trainees to experience these scenarios virtually, without any actual risk. For example, a VR module can simulate an oil rig fire, enabling workers to practice evacuation procedures safely.
b. Cost-Efficiency
Building and maintaining physical training setups, such as drilling rigs or pipelines, is expensive. VR and AR eliminate the need for these setups by replicating them digitally. Trainees can repeatedly practice complex tasks, reducing the cost of equipment wear and operational downtime.
c. Improved Knowledge Retention
Research shows that immersive experiences enhance memory and understanding. VR and AR training engage multiple senses, making the learning process more interactive and impactful. Workers trained with these tools often recall procedures more effectively than those trained using traditional methods.
d. Remote Accessibility
With VR and AR, trainees can access training modules from remote locations. This is particularly beneficial for offshore operations or regions with limited training infrastructure. Remote accessibility reduces travel costs and allows consistent training for a geographically dispersed workforce.
Applications of VR and AR in Oil and Gas Training
a. Rig Operations and Maintenance
VR simulations replicate the layout of rigs, enabling workers to practice equipment handling, maintenance, and troubleshooting. AR overlays can guide technicians on-site by displaying step-by-step instructions through smart glasses or tablets.
b. Emergency Response Training
In emergencies, every second counts. VR enables workers to rehearse responses to blowouts, chemical spills, and gas leaks. By repeatedly practicing in a virtual environment, workers develop confidence and quick decision-making skills.
d. HSE (Health, Safety, and Environment) Protocols
Safety drills can be conducted in virtual environments, emphasizing hazard identification and risk mitigation. AR devices can also assist in real-time hazard detection, enhancing situational awareness during live operations.
Future Trends in VR and AR Training
a. Integration with AI
Combining VR and AR with Artificial Intelligence (AI) will enable personalized training experiences. AI algorithms can analyze a trainee’s performance, identify weaknesses, and suggest tailored training modules.
b. Use of Digital Twins
Digital twin technology, which creates virtual replicas of physical assets, can enhance training accuracy. Workers can interact with a virtual version of their specific equipment, making the training directly applicable to their job roles.
c. Real-Time Collaboration
Future developments in AR could facilitate real-time collaboration between on-site workers and remote experts. For example, an engineer on an offshore rig could use AR glasses to share their field of view with a specialist in another location, receiving instant guidance.
Challenges and Considerations
While VR and AR training offer numerous benefits, there are challenges to address:
High Initial Investment: Developing VR and AR infrastructure requires significant upfront costs.
Technology Adoption: Resistance to adopting new technologies may exist among the workforce, especially older employees.
Maintenance and Updates: VR and AR content must be regularly updated to reflect changing industry standards and equipment.
Bandwidth Requirements: Remote training may require high-speed internet, which is not always available in offshore or remote locations.
To sum up, VR and AR simulations are revolutionizing training in the oil and gas industry. By offering safe, immersive, and cost-effective learning experiences, these technologies prepare workers for the complexities of their roles while minimizing risks. As VR and AR continue to evolve, their integration with AI and digital twins will further enhance their utility, ensuring that the oil and gas workforce remains skilled and prepared for future challenges.
The design and functionality of marine passenger seats play a crucial role in ensuring passenger comfort and safety. Alongside ergonomic features and robust materials, easy installation and maintenance have become key considerations for marine passenger chair manufacturers and vessel operators. These features not only reduce downtime but also lower overall operational costs.
Importance of Easy Installation
Marine environments pose unique challenges, making efficient seat installation vital for vessel operations. Quick and straightforward installation processes offer several benefits:
Reduced Labor Costs: Easy-to-install seats minimize the time and effort required by technicians, saving on labor expenses.
Faster Vessel Preparation: Simplified designs allow for quicker setup during retrofitting or new vessel construction, ensuring vessels are operational without delays.
Modular Designs: Modern modular marine passenger chairs often feature modular components, enabling flexibility during layout adjustments or seat replacement.
Lightweight Materials: Seats made from aluminum alloys or reinforced composites reduce the weight, facilitating easier handling and installation.
Pre-Drilled Mounting Points: Standardized mounting points align with vessel configurations, eliminating the need for custom drilling or modifications.
Integrated Mounting Hardware: Packages that include all necessary hardware streamline the installation process and reduce the chances of missing components.
Maintenance-Friendly Design
Maintenance is a critical factor for ensuring the longevity and functionality of marine passenger seats. Seats designed with maintenance in mind exhibit features that simplify care and reduce downtime:
Durable Upholstery: High-quality, marine-grade fabrics and coatings resist saltwater, UV rays, and frequent cleaning, prolonging seat life.
Removable Cushions: Seats with detachable cushions make cleaning and replacement quick and hassle-free.
Access Panels: Built-in access panels allow for inspection and maintenance of seat mechanisms without requiring seat removal.
Non-Corrosive Materials: Components crafted from stainless steel or anodized aluminum resist corrosion, reducing the need for frequent repairs.
Advantages of Easy Maintenance
Efficient maintenance translates into operational and economic benefits:
Extended Service Life: Regular, simplified maintenance ensures seats remain in optimal condition for longer periods.
Cost Savings: Easy access to replaceable parts minimizes the expenses associated with professional repairs or replacements.
Industry Trends
Manufacturers are increasingly focusing on innovations to enhance both installation and maintenance aspects of marine passenger seats:
Tool-Free Assembly: Advanced designs incorporate snap-fit or quick-lock mechanisms, enabling installation without specialized tools.
Eco-Friendly Materials: Sustainable materials are being integrated, which are durable and easy to maintain while reducing environmental impact.
Digital Integration: Some seats now include sensors for condition monitoring, alerting operators to maintenance needs before issues arise.
In summary, marine passenger seats designed for easy installation and maintenance provide significant advantages for vessel operators. By combining ergonomic comfort, durable construction, and practical features, these seats ensure passenger satisfaction while minimizing operational challenges. As technology advances, the industry will continue to see innovative solutions that enhance efficiency and reduce costs, making them an essential investment for modern marine vessels.
Morse code, one of the earliest forms of electronic communication, continues to play a critical role in modern marine navigation, especially through the use of Morse code lights. Despite advancements in satellite and radio communications, the simplicity, reliability, and versatility of Morse code remain invaluable in situations where other systems might fail or be unavailable. This article explores the significance, applications, and modern adaptations of Morse code lights in the maritime industry .
The Historical Importance of Morse Code in Navigation
Invented in the 1830s by Samuel Morse, Morse code quickly became a universal communication tool. It uses a series of dots (short signals) and dashes (long signals) to convey messages, making it adaptable for use in sound, light, and radio transmissions. In vessel navigation, marine Morse code lights became synonymous with safety and efficient communication, allowing vessels to signal distress or relay information across long distances.
What Are Morse Code Lights?
Morse code lights are systems that transmit messages using flashes of light to represent the dots and dashes of Morse code. These lights are typically part of signal lamps or searchlights equipped for manual or automated operation.
Manual Systems: Operated by a trained signaler using a shutter or button to create flashes.
Automated Systems: Utilize modern LED or xenon lights programmed to emit Morse code messages automatically.
Applications in Modern Marine Navigation
Distress Signaling
Morse code lights are often used in emergencies to signal distress, especially in the event of radio communication failure. The universally recognized “SOS” (··· — ···) is a staple of maritime safety.
Ship-to-Ship Communication
Vessels can exchange essential information using Morse code lights, especially in areas where radio interference or language barriers exist.
Ship-to-Shore Signaling
Ports and harbors may use Morse code lights to guide vessels during docking or in low-visibility conditions.
Navigational Aid
Lighthouses and navigational buoys sometimes employ Morse code light patterns to convey location-specific signals to nearby vessels.
Military and Covert Operations
In naval operations, Morse code lights are used for silent communication to avoid detection by hostile forces.
Advantages of Morse Code Lights
Reliability: Morse code lights function independently of complex systems, making them dependable during power outages or equipment failures.
Simplicity: Easy to operate and interpret, requiring minimal technical infrastructure.
Versatility: Can be used in a variety of settings, from small boats to large commercial vessels.
Compatibility: Universally understood, overcoming language and technical barriers in international waters.
Technological Advancements in Morse Code Lights
Modern technology has enhanced the functionality and efficiency of Morse code lights:
LED Integration: High-efficiency LED lights offer brighter and more energy-efficient signaling compared to traditional incandescent bulbs.
Automated Systems: Pre-programmed signals reduce human error and speed up communication in critical scenarios.
Synchronization with GPS: Some systems integrate with GPS to ensure precise timing and location-specific signaling.
Durability: Modern materials provide resistance to harsh marine environments, extending the lifespan of Morse code light systems.
Challenges and Limitations
While Morse code lights are invaluable, they are not without challenges:
Learning Curve: Operators require training to send and decode messages effectively.
Weather Dependence: Visibility can be hindered by fog, rain, or high waves.
Reduced Usage: The prevalence of advanced communication systems has led to a decline in Morse code proficiency among modern mariners.
The Future of Morse Code Lights
As maritime safety evolves, Morse code lights are expected to maintain their relevance as a reliable backup system. Integration with digital tools and automation ensures that Morse code remains a vital component of marine navigation lighting systems, bridging the gap between traditional methods and modern technology.
Conclusion
Morse code lights, a time-tested maritime communication tool, continue to serve as a critical backup and supplemental system in marine navigation. Their simplicity, reliability, and adaptability ensure their role remains relevant in safeguarding lives and vessels at sea. Whether signaling distress or guiding ships in adverse conditions, Morse code lights embody the enduring value of straightforward communication in a high-tech world.
Torx screws are a popular fastening solution in industries ranging from electronics to automotive and construction. Known for their six-point star-shaped pattern, Torx screws provide improved torque transfer, reduced wear, and a secure fit, making them a reliable choice in various applications. This article explores the different types of Torx screws and their unique characteristics.
1. Standard Torx Screws
Standard Torx screws feature a six-pointed star recess designed for use with standard Torx screwdrivers or bits. These screws are commonly used in applications requiring a high torque without the risk of cam-out.
Key Features:
Available in a wide range of sizes (e.g., T1 to T100).
Suitable for electronics, automotive, and machinery applications.
Reduce tool wear and ensure consistent fastening.
2. Tamper-Resistant Torx Screws
Also known as Torx TR, these screws include a pin in the center of the star recess, requiring a special tamper-proof Torx bit for removal. They are ideal for preventing unauthorized access.
Key Features:
Enhanced security due to the unique recess.
Common in public installations, consumer electronics, and safety equipment.
Available in various sizes and finishes.
3. Torx Plus Screws
Torx Plus screws feature an updated design with rounded lobes, providing greater contact area between the screw and tool. This design delivers higher torque and minimizes wear.
Key Features:
Higher strength compared to standard Torx.
Improved resistance to stripping under high torque.
Often used in heavy-duty machinery and automotive assembly.
4. External Torx Screws
Instead of having a recessed star pattern, external Torx screws have the star shape protruding from the head. These screws are paired with external Torx sockets.
Key Features:
Allow for higher torque applications.
Commonly used in automotive and industrial equipment.
Offer enhanced grip for external tools.
5. Torx Wing Screws
These screws are a unique variation of the standard Torx design, incorporating a winged head for manual tightening or loosening. They are convenient for applications requiring frequent adjustments.
Key Features:
No tools required for operation.
Suitable for light-duty applications.
Found in furniture assembly and adjustable fixtures.
6. Flat Head Torx Screws
Flat head Torx screws have a countersunk design, allowing them to sit flush with or below the surface. They are widely used in applications where a smooth finish is desired.
Key Features:
Ideal for aesthetic applications.
Available in multiple lengths and diameters.
Common in woodworking, construction, and furniture.
7. Button Head Torx Screws
Button head Torx screws have a rounded top with a lower profile, making them suitable for applications requiring minimal protrusion.
Key Features:
Decorative and functional.
Provide a sleek, finished look.
Popular in electronics and consumer products.
8. Socket Head Torx Screws
These screws feature a cylindrical head with a recessed Torx drive, providing a strong, durable fastening solution for high-torque applications.
Key Features:
High strength for structural applications.
Common in machinery and industrial assembly.
Compact design reduces bulk.
In summary, Torx screws have revolutionized the fastener industry with their versatile designs and robust performance. From standard Torx screws for general use to specialized options like tamper-resistant and external Torx screws, there’s a Torx screw for every application. Selecting the right type ensures optimal performance, durability, and security in your project.
A thermostatic water bath is an essential piece of laboratory equipment used for precise temperature control during various applications. Choosing the right one can ensure accurate results, efficient operation, and longevity of the equipment. Here’s a a detailed guide to help you choose the right thermostatic water bath.
1. Determine the Application Requirements
Understanding the purpose of the water bath is the first step:
Temperature Range: Identify the temperature range required for your experiments. Standard water baths typically range from room temperature to about 100°C, while specialized models may go lower or higher.
Temperature Uniformity and Stability: Ensure the water bath can maintain consistent temperature uniformity and stability, especially for sensitive applications such as enzymatic reactions or sample incubation.
Small Laboratories: A 2- to 5-liter bath might be sufficient for small-scale applications.
High-Volume Workflows: Choose a larger unit, 10 liters or more, to accommodate multiple samples or larger containers.
3. Evaluate the Type of Control System
Analog Controls: Suitable for basic applications where fine adjustments are unnecessary.
Digital Controls: Offer precise temperature settings, often with features like timers and alarms, making them ideal for advanced research.
4. Consider the Heating Technology
Different heating methods affect performance:
Direct Heating: Efficient and quick, suitable for non-corrosive liquids.
Circulating Systems: Provide uniform temperature distribution, excellent for samples requiring consistent conditions.
5. Material and Build Quality
Choose materials that suit your laboratory environment:
Interior Material: Stainless steel is durable, easy to clean, and resistant to rust and corrosion.
Exterior Material: Insulated and sturdy casings help maintain temperature efficiency and safety.
6. Safety Features
Laboratory safety is paramount. Look for:
Over-Temperature Protection: Automatically shuts off the heater to prevent overheating.
Low-Water Level Alarms: Alerts you when water levels drop, avoiding damage to the heater.
7. Additional Features
Accessories: Consider racks, lids, and drains that make operation convenient.
Energy Efficiency: Opt for models designed to minimize energy consumption.
Portability: For laboratories that require mobility, select a water bath with a compact design and handles.
8. Compliance and Certifications
Ensure the water bath complies with industry standards and certifications such as ISO, CE, or UL, guaranteeing quality and reliability.
9. Budget and Warranty
Cost vs. Features: Balance between your budget and the features needed for your application.
Warranty and Support: Choose a model with a solid warranty and reliable customer service to handle any issues.
10. Reputable Supplier
Select a trusted supplier that provides high-quality thermostatic water baths, comprehensive technical support, and after-sales service. Companies like Drawell offer a wide range of models designed for diverse laboratory needs.
Conclusion
Choosing the right thermostatic water bath involves assessing your specific requirements, understanding technical specifications, and considering long-term usability. By following this guide, you can invest in a water bath that enhances your laboratory’s efficiency and meets all your operational demands.
Manufacturing custom plush toys can be both a creative and profitable venture, especially when cost-efficiency is prioritized without compromising quality. The process involves a blend of design expertise, material selection, and optimized production methods to meet customer demands while ensuring affordability. Below are the critical factors and strategies for achieving cost-efficiency in custom plush toy manufacturing.
1. Streamlined Design and Prototyping
Simplify designs: Minimizing complex details can significantly reduce production time and labor costs.
Use digital prototyping: 3D rendering software can create realistic models for approval, reducing the need for multiple physical prototypes.
Optimize sizing: Standardized toy sizes can help in material utilization and simplify logistics.
2. Material Selection
Bulk sourcing: Purchase plush toy materials like fabric, stuffing, and threads in bulk to avail of wholesale discounts.
Sustainable alternatives: Choose cost-effective, eco-friendly materials, which are increasingly preferred by consumers and often come with long-term cost benefits.
Standardized materials: Using consistent materials across multiple designs simplifies inventory management.
3. Optimized Manufacturing Processes
Automation: Invest in automated sewing and cutting equipment to enhance speed and precision.
Skilled labor allocation: Assign specific tasks to skilled workers to ensure efficiency in specialized areas, such as embroidery or assembly.
Reduce waste: Implement waste management systems to recycle offcuts and unused materials.
4. Vendor and Supply Chain Management
Reliable suppliers: Partner with trustworthy vendors who provide quality materials at competitive prices.
Strategic location: Select manufacturing hubs near material suppliers to lower transportation costs.
Inventory control: Maintain a just-in-time (JIT) inventory system to minimize storage costs.
5. Batch Production and Scaling
Large production runs: Producing in batches reduces per-unit costs as fixed expenses, like setup costs, are distributed over more units.
Modular designs: Create base designs that allow for easy customization with minimal additional effort.
6. Energy Efficiency
Upgrade equipment: Use energy-efficient machinery to reduce electricity consumption during production.
Renewable energy: Consider solar or other renewable energy sources to power factories, lowering utility bills over time.
7. Effective Marketing and Distribution
Pre-orders: Accept pre-orders to estimate demand and avoid overproduction.
Direct-to-consumer (DTC): Reduce distribution costs by selling directly to customers via online platforms.
Outsource shipping: Partner with logistics providers offering competitive rates for bulk shipments.
8. Quality Control to Minimize Returns
Implement strict quality checks to ensure each plush toy meets standards, reducing the cost associated with returns or replacements.
Focus on durability: High-quality materials and construction reduce the chances of product defects and enhance customer satisfaction.
9. Leverage Digital Tools
Use enterprise resource planning (ERP) systems for streamlined operations and cost tracking.
Digital marketing: Reduce advertising costs by leveraging social media platforms and influencer partnerships to promote the toys.
Balancing Cost and Quality
While cost-efficiency is critical, custom plush manufacturers must balance it with maintaining high quality. Subpar products can harm brand reputation and customer loyalty. By employing strategic cost-saving measures, manufacturers can ensure profitability while delivering exceptional plush toys that meet market expectations.
Cost-efficiency is not just about cutting expenses; it’s about smart investments in technology, materials, and processes to achieve sustainable growth in the competitive custom plush toy market.
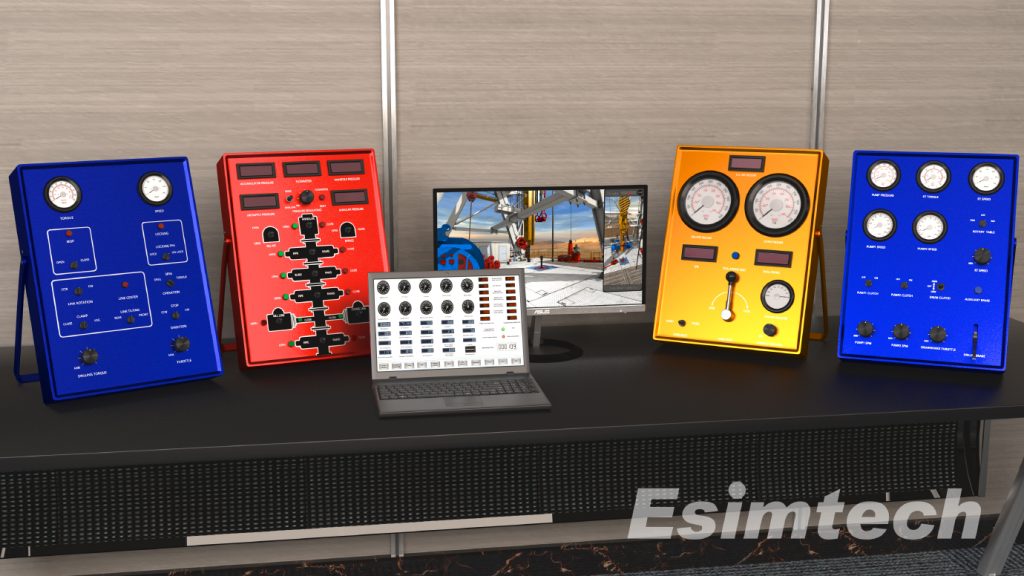
Well logging is a crucial technique in the oil and gas industry used to gather subsurface information about a well. By deploying specialized tools downhole, operators can measure various properties of the rocks and fluids in the wellbore, helping to evaluate the potential for oil or gas production, identify reservoirs, and guide drilling and completion decisions. Well logging has become an essential part of exploration and production, offering real-time data that drives decision-making throughout the lifecycle of a well.
In recent years, well logging simulations have gained popularity as powerful tools for enhancing well performance, improving accuracy, and optimizing well design. These simulations replicate real-world logging conditions in a virtual environment, providing valuable insights and aiding in risk mitigation and cost reduction.
This article explores the principles of well logging and how well logging simulations are transforming the industry.
What is Well Logging?
Well logging involves measuring the physical properties of rocks, fluids, and formations in a borehole using a variety of tools known as logging tools. These tools are typically lowered into the wellbore and then used to record data on parameters such as porosity, permeability, resistivity, temperature, and pressure.
Some of the common well logging techniques include:
Wireline Logging: A traditional technique where a logging tool is lowered into the well on a wireline cable. It provides high-quality data for subsurface evaluation.
LWD (Logging While Drilling): This method uses specialized tools that are integrated into the drill string, providing real-time logging data during the drilling process.
Mud Logging: Involves analyzing drilling fluid to gain information about the rock formations encountered during drilling.
Key types of well logs include:
Resistivity Logs: Measure the electrical resistance of the rock formations to infer the presence of hydrocarbons.
Gamma Ray Logs: Measure the natural radioactivity of rocks to identify lithology and distinguish between shale and non-shale formations.
Neutron Porosity Logs: Measure the hydrogen content in the formation, which is used to estimate porosity.
Density Logs: Measure the electron density of the formation to determine its density and porosity.
Sonic Logs: Measure the travel time of sound waves through the formation to calculate porosity and lithology.
Nuclear Magnetic Resonance (NMR) Logs: Provide detailed information on porosity and fluid distribution in the formation.
Importance of Well Logging
Well logging serves several vital functions in the oil and gas industry:
Formation Evaluation: Well logs provide valuable data that helps in identifying the formation’s properties such as porosity, permeability, and the presence of hydrocarbons.
Reservoir Characterization: Data from well logs can be used to map the reservoir, estimate the amount of recoverable resources, and design optimal production strategies.
Drilling Optimization: Well logging helps in making critical decisions about drilling parameters, wellbore stability, and the potential for encountering high-pressure zones.
Production Planning: By assessing formation characteristics, operators can design better production and completion strategies to maximize recovery and minimize costs.
Monitoring: Logging tools can also be used to monitor well integrity, fluid flow, and changes in reservoir conditions over time.
Well logs are the backbone of subsurface modeling and form the foundation for creating geological models, reservoir simulations, and production forecasts.
What Are Well Logging Simulations?
Well logging simulations are virtual models that replicate the conditions of a wellbore during the logging process. These simulations use advanced computer software to model how well logging tools would behave in different subsurface environments. By incorporating geological data, wellbore characteristics, and logging tool specifications, simulations can predict how real-world logging operations will unfold.
Well logging simulations offer several advantages over traditional logging techniques:
Cost Efficiency: Simulations allow operators to test logging scenarios without the need to deploy expensive tools downhole, reducing operational costs.
Risk Reduction: By simulating different scenarios, operators can identify potential issues, such as tool failure, downhole obstructions, or environmental challenges, before they occur in real life.
Training and Education: Simulations provide a safe and controlled environment for training new personnel on how to use logging tools and interpret data without risking real-world equipment or wellbore integrity.
Wellbore Design Optimization: Simulations can be used to evaluate various wellbore configurations and determine the most effective logging strategy for different types of reservoirs.
Enhanced Data Interpretation: Simulated data can help geologists and engineers better understand how logging tools interact with specific formations, improving the accuracy of well log interpretation.
How Well Logging Simulations Work
Well logging simulations involve creating a detailed digital model of the wellbore and the surrounding geological formations. Key components of a well logging simulation include:
Geological Data: Information about the rock formations, fluid properties, and environmental conditions are inputted into the simulation model.
Logging Tool Characteristics: The specifications of the logging tool, such as its resolution, sensitivity, and measurement capabilities, are incorporated into the simulation to replicate its behavior in different conditions.
Wellbore Design: The simulation includes the design of the wellbore, including casing, cementing, and drilling parameters, to evaluate how these factors affect logging performance.
Software Algorithms: Specialized algorithms are used to simulate the interaction between the logging tool and the formation. These algorithms take into account physical phenomena, such as fluid dynamics, electromagnetic properties, and acoustic waves, to generate realistic data.
Data Output: The simulation produces synthetic well log data that mimics what would be obtained from a real logging operation. This data can be analyzed to determine the effectiveness of various logging techniques and strategies.
Benefits of Well Logging Simulations
1. Improved Planning and Decision Making
Simulations allow engineers and geologists to predict how different logging techniques will perform in specific subsurface conditions. This predictive capability helps in:
Selecting the right logging tools: Engineers can test different tool combinations to determine which will provide the most reliable data for the formation being studied.
Optimizing wellbore designs: Simulations help assess how wellbore integrity and design will impact logging results, leading to better well planning.
Scenario testing: Operators can simulate various geological scenarios, such as varying pressure conditions, lithology changes, or presence of fractures, to anticipate challenges before they arise.
High temperatures and pressures that may affect tool performance.
Obstructions in the wellbore, such as rock formations or debris, that could damage equipment.
Fluid migration that may interfere with tool calibration and data accuracy.
Simulations allow for early detection of these risks, reducing the likelihood of costly errors during actual logging operations.
3 Training and Skill Development
Well logging simulations provide a hands-on, risk-free environment for training drilling and logging crews. Engineers can practice interpreting simulated log data and troubleshooting issues without the need for live wells or costly field operations. This helps in:
Improving interpretation skills: Trainees can analyze simulated logs from various formations to gain a better understanding of how to interpret well data accurately.
Enhancing tool operation knowledge: Operators can learn the intricacies of different logging tools and their functionality in various geological environments.
Safe and effective learning: Simulation-based training avoids the high risks associated with on-the-job training in real wells.
Challenges of Well Logging Simulations
While well logging simulations offer significant benefits, there are some challenges to consider:
Complexity of Models: Creating accurate simulations requires high-quality geological data and advanced software, which can be difficult to obtain or expensive.
Software and Hardware Requirements: Simulations require robust computing power and specialized software, which may require significant investment.
Accuracy of Predictions: While simulations provide valuable insights, they are based on assumptions that may not always reflect real-world conditions, leading to potential discrepancies.
Summary
Well logging is an essential technique in the oil and gas industry, providing critical information about subsurface formations that guide drilling, production, and completion decisions. With the advent of well logging simulations, the industry has gained a powerful tool for improving the accuracy, efficiency, and cost-effectiveness of well operations.
Simulations enable operators to optimize well design, reduce operational risks, and enhance training programs, making them an invaluable part of modern exploration and production strategies. As technology continues to advance, well logging simulations will undoubtedly play a more prominent role in shaping the future of oil and gas exploration, offering smarter, safer, and more efficient ways to extract valuable resources from beneath the earth’s surface.
In the fast-paced world of printing, ensuring high-quality output is crucial for maintaining customer satisfaction, reducing waste, and staying competitive. Traditional methods of inspection, such as manual checks and visual spot inspections, are often time-consuming, prone to human error, and inefficient in detecting subtle defects. As the demand for higher print quality and consistency increases, the adoption of automated 100% inspection systems has become a popular solution. These systems use advanced technologies like cameras, sensors, and artificial intelligence to inspect every printed piece for defects, ensuring that only flawless products reach the market.
The upfront costs for implementing a 100% inspection system can be significant. These systems typically involve:
High-resolution cameras: The core component of the system, which can cost anywhere from a few thousand to tens of thousands of dollars, depending on the resolution and technology used.
Software for defect detection and analysis: These programs can range from specialized defect-detection software to AI-driven platforms that provide real-time analysis and reporting. Licensing fees, integration costs, and ongoing maintenance can add to the overall investment.
Integration into existing workflows: Retrofit and integration of the system into existing print lines, ensuring compatibility with other equipment, can incur additional installation costs.
Training and education: Employees will need to be trained on how to operate and maintain the system, which adds to both the time and cost required for deployment.
In total, a full 100% inspection system may require an investment of $50,000 to $250,000 or more, depending on the scale of the printing operation and the complexity of the system.
Operational Costs
Once the system is in place, operational costs are typically lower compared to manual inspection methods. These include:
Power consumption: The cameras and processing units used in the system may consume more electricity than traditional inspection methods, though this is usually a minor cost.
Maintenance and software updates: Regular maintenance of the system’s hardware and software updates are necessary to ensure peak performance, and ongoing support contracts may be required.
Technical support staff: Although the system reduces the need for manual labor, companies will need to allocate resources to monitor the system and address any issues that arise.
Overall, operational costs are generally lower than the manual inspection methods, which require a dedicated labor force to inspect and identify defects on each printed sheet.
Benefits of 100% Inspection Systems
1. Increased Quality Control
One of the most significant benefits of 100% inspection systems is enhanced quality control. These systems can detect even the smallest defects, such as color inconsistencies, misalignment, and print flaws, which human inspectors may miss. This results in:
Fewer defective products: By identifying issues early in the process, 100% inspection systems reduce the risk of defective products reaching customers.
Consistency across production runs: Automated systems ensure that quality standards are maintained consistently, even across large production volumes or long production runs.
2. Reduced Waste and Rework Costs
Defects caught early can be corrected before the product moves further down the production line, reducing the need for expensive rework. The result is:
Lower material wastage: Defective products can be identified and removed before they waste valuable raw materials.
Reduced downtime: Detecting defects in real-time allows for quicker adjustments, reducing the likelihood of production stoppages and unnecessary delays.
Lower scrap rates: Consistently high-quality prints mean fewer products are discarded, which contributes to better cost control.
3. Enhanced Efficiency and Faster Production Times
100% inspection systems operate continuously without breaks, which leads to:
Faster detection and resolution: Real-time analysis ensures that defects are caught instantly, leading to faster corrections.
Higher throughput: With the system running efficiently, the overall speed of production can increase, making better use of resources and reducing idle time.
4. Labor Cost Savings
By automating the inspection process, companies can:
Reduce the need for manual inspectors: The system eliminates the reliance on human inspectors, saving on labor costs and reducing the risk of errors due to fatigue or oversight.
Optimize workforce allocation: Employees can focus on higher-level tasks, such as maintenance and equipment optimization, rather than repetitive inspection duties.
5. Data and Reporting for Continuous Improvement
Modern 100% inspection systems come with robust data collection and reporting capabilities that allow companies to:
Track defects and trends: The printing quality inspection system records and categorizes defects, providing valuable insights into recurring problems and potential areas for improvement.
Generate reports for quality audits: The data collected can be used for internal quality audits, making it easier to ensure compliance with industry standards and customer requirements.
Cost Savings Over Time
While the initial investment is substantial, the long-term savings generated by 100% inspection systems often justify the expense. Over time, companies can expect:
A return on investment (ROI): For many printing operations, the cost savings from reduced defects, lower waste, and labor savings can quickly outweigh the initial investment.
Increased competitiveness: Consistent product quality and fast turnaround times can help a printing company stay competitive, attracting more customers and potentially commanding higher prices for its products.
Long-term scalability: As production volumes increase, the system can handle higher throughput without additional labor costs, allowing companies to scale up without significant additional investment.
Challenges to Consider
While the benefits are clear, there are challenges to consider when implementing 100% inspection systems:
High initial cost: Smaller printing companies may find it difficult to justify the upfront investment.
Integration with legacy systems: Some older printing equipment may not be easily compatible with modern inspection technologies, requiring expensive upgrades or replacements.
Learning curve: Employees may need time to adapt to new technologies, which could impact initial productivity.
The decision to invest in a 100% inspection system in the printing industry requires careful consideration of both costs and benefits. While the initial investment can be high, the long-term advantages—such as improved quality, reduced waste, enhanced efficiency, and lower labor costs—often result in a significant return on investment. For companies that prioritize quality control and aim for long-term growth, adopting a 100% inspection system can be a strategic move to enhance their competitive edge in an increasingly quality-conscious market.
Marine environments present unique challenges for lighting solutions, particularly when safety is critical in hazardous locations such as oil rigs, tankers, and refineries. Explosion-proof lighting has become essential in these environments to mitigate risks associated with flammable gases, vapors, and dust. Below, we explore the importance of explosion-proof lighting and the tailored solutions available for different marine settings.
The Importance of Explosion-Proof Lighting in Marine Environments
Explosion-proof lighting is designed to prevent ignition of combustible substances in hazardous areas. The key features include:
Robust Construction: Sealed enclosures to prevent sparks or heat from escaping.
Corrosion Resistance: Designed to withstand saline environments and harsh weather conditions.
Compliance with Standards: Certified to meet industry safety standards like ATEX, IECEx, or UL.
These lights ensure operational safety while providing reliable illumination for essential tasks.
Types of Marine Environments and Challenges
1. Offshore Platforms
Offshore platforms are prone to high concentrations of flammable gases and extreme weather conditions. Lighting must endure constant vibration, saline corrosion, and potential impact from tools or machinery.
Solution: Explosion-proof LED floodlights with marine-grade aluminum housing provide long-lasting, vibration-resistant lighting with minimal maintenance.
2. Tankers and Cargo Ships
Tankers often transport flammable materials, posing risks in confined spaces like cargo holds or engine rooms.
Solution: Compact marine explosion-proof lights with narrow beam angles ensure efficient illumination while minimizing energy consumption. Anti-vibration designs and IP66/IP67-rated enclosures offer enhanced durability.
3. Ports and Harbors
Ports and harbors experience high humidity, corrosive air, and frequent exposure to chemicals.
Solution: Corrosion-resistant explosion-proof lighting with high ingress protection ratings (IP68) ensures performance in wet and dusty environments.
4. Marine Refineries
Refineries handle combustible chemicals, requiring lighting to function in potentially explosive atmospheres.
Solution: Explosion-proof fluorescent or LED fixtures with advanced heat dissipation mechanisms provide stable illumination without overheating.
Wide Temperature Range: Operates in extreme cold or heat, critical for Arctic or tropical environments.
Emergency Backups: Integrated battery systems ensure lighting continuity during power outages.
Dimming Capabilities: Adjustable brightness for specific tasks or energy conservation.
Choosing the Right Explosion-Proof Lighting
When selecting explosion-proof lighting, consider:
Hazard Classification: Match lighting to the zone (e.g., Zone 0, 1, or 2) based on the likelihood of explosive conditions.
Ingress Protection (IP) Rating: Choose a rating suitable for exposure to water and dust.
Material Durability: Opt for materials like stainless steel or marine-grade aluminum to resist corrosion.
Certification Compliance: Verify compliance with international safety standards.
Innovations in Explosion-Proof Lighting for Marine Use
Advancements in technology have made explosion-proof lighting more efficient and versatile:
Smart Control Systems: IoT-enabled lighting allows remote monitoring and control, reducing manual inspections.
Adaptive Lighting: Sensors adjust brightness based on ambient light and activity levels.
Solar-Powered Solutions: Sustainable options for isolated locations with limited power access.
Overall, explosion-proof lighting solutions are indispensable in safeguarding operations and personnel in various marine environments. By addressing specific challenges and leveraging modern technologies, these solutions ensure safety, reliability, and efficiency, even in the most demanding conditions. Investing in the right lighting not only protects lives but also enhances productivity in hazardous marine settings.